Text and Photography
by Jim Langley and Chirag Asaravala
There is no doubt our hobby is an expensive one. Most
of us save our project receipts but cringe at the thought
of ever actually tallying up the expenses. Many of us
have spent a paycheck on car parts, and most have done
so well before actually receiving the paycheck!
So when an opportunity is presented to get a good deal
on an otherwise big-ticket performance part, you can't
help but take advantage. One such company is making a
business out of this very concept. Professional Products
has taken perhaps the un-admirable role of making "knock
offs" of popular "E" brand intake manifolds.
By taking advantage of lower

It's no secret where the
manifolds are produced. |
materials and labor costs overseas,
Pro Products can bring to market versions of Edelbrock's
popular "Performer", "RPM", and "Victor
Jr." intakes for less than two-thirds the cost (The
satin "Typhoon" EFI intake runs around $300,
compared to $500 for the Edelbrock RPM. Shown is the polished
version, which is around $400.)
Now we're well aware
of the sociopolitical flood gates we're opening regarding
supporting companies that use cheap foreign labor. We're
not concerning ourselves with that debate, it's your decision.
In this article we are strictly focusing on reviewing
the product and whether or not it's worth the dollars.
Or yuan. Or whatever.
Pro Products sent us their Typhoon Power-Plus 5.0L EFI
manifold for evaluation. The kit consists of a lower and
upper manifold, available in polished or satin. There
is no hiding the fact that this is a virtual replica of
Edelbrock's proven Performer RPM design. We felt at a
price tag of under $400 (compared to nearly $600 for the
real thing) this may be a popular option for budget-minded
enthusiasts who are not sure if an intake
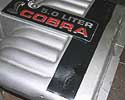
The Cobra intake plenum was
cut off to allow porting the runners, then welded
back together. |
upgrade will net any more power
on their existing combo. This is precisely the position
we were in with our Project Green Machine II, Tech Editor
Jim Langley's 1992 5.0L Mustang. The car has been down
to consistent 12.2x ET's at 113 mph with a heavily-ported
Cobra intake manifold. Jim wasn't convinced that spending
half-a-grand on an Edelbrock intake would yield significant
gains over the hogged out Cobra. Yet he acknowledged that
without trying he'd always wonder if the ported Trick
Flow heads and stealth custom cam were being held back.
So one afternoon off came the Cobra and on went the Typhoon.
Inspection of the Typhoon reveals the cost savings. The
intake is nowhere near as cleaned up as its Edelbrock
counterpart. The port openings are irregular and inconsistent
in size, and there is considerable casting flash in the
runners. Visually it appears the mating surfaces are square,
but we wouldn't be surprised if they run wider tolerances
than domestic product. Nevertheless the problems are not
insurmountable. Most guys may be willing to sacrifice
a couple hours of cleanup time with a die grinder for
$200 in the bank. We spent a little time gasket matching
the port openings (see below), and cleaning up excessive
flash.
On the plus side the polished intake looks decent and
claims to be hand polished. All the appropriate ports
comes tapped and cleaned, and the box includes the correct
fittings and hardware. We had no issues installing it,
and it sealed up as would any new intake. We've detailed
the installation on the next few pages.
Gasket Matching
Typically intake manifolds are manufactured with port
dimensions slightly to grossly smaller than the port on
the cylinder head. This ensures that a smaller cross section
is feeding into a larger one, a fairly safe transition
and easy way to increase velocity through the intake tract.
Of course this
Porting entails reshaping
the entire runner, as was done on our Cobra intake. |
comes at a cost of less volume
than may be optimal for the motor. Intake porting is a
procedure to address this. Like cylinder head porting,
it is an end-to-end methodical hogging out of the runner
and ports. The end goal with an intake port job is to
complement the cylinder heads, in flow and volume but
also in transition fron the intake to the head. Gasket
matching on the otherhand is simply the latter- opening
up the port entries or exits to the size of the gasket
or head. The objective being to ensure there is a good
even transition between the intake and head, without steps
or ledges obstructing flow. With gasket matching we are
not concerning ourselves with changing the volume or flow
path inside the runners.
The Typhoon intake clearly needs to be gasket matched.
It is obvious that the foundry does a minimal clean up
of the ports and runners before shipping. This way labor
costs are kept down, as are costs for sophisticated CNC
machinery. This is how the intake can be priced so low.
Yet this is not necessarily bad. If you are serious about
power, you should be checking the port transitions on
any intake, Edelbrock or otherwise. In our experience
we've found that you end up gasket matching most of the
time, as your head port work or milling work varies from
stock. The procedure is not that tough as detailed here
by Jim Langley.

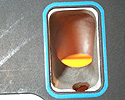
 Gasket matching an intake
manifold begins with finding the relative position
of the manifold and gasket to the head when installed.
Temporarily bolt down the manifold with gaskets.
Note where the top of the gasket sits in position
to the intake and head (arrow.) Scribe a mark on
the gasket to mark the position of the intake manifold
edge.
Gasket matching an intake
manifold begins with finding the relative position
of the manifold and gasket to the head when installed.
Temporarily bolt down the manifold with gaskets.
Note where the top of the gasket sits in position
to the intake and head (arrow.) Scribe a mark on
the gasket to mark the position of the intake manifold
edge. |
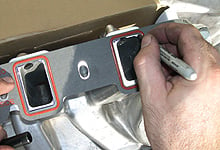
 With the manifold and gaskets
removed from the head, position the gasket against
the intake manifold using the marked scribed in
step one. Then using a permanent marker, machinists
dye, or a scratch awl trace the gasket port boundaries
to the manifold. Note, we're using a Mr.Gasket #5833
intake gasket. This is equivalent to a Fel Pro #1250
(1.20" x 2.00")
With the manifold and gaskets
removed from the head, position the gasket against
the intake manifold using the marked scribed in
step one. Then using a permanent marker, machinists
dye, or a scratch awl trace the gasket port boundaries
to the manifold. Note, we're using a Mr.Gasket #5833
intake gasket. This is equivalent to a Fel Pro #1250
(1.20" x 2.00") |

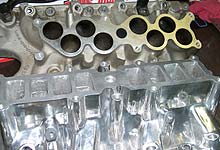
 Once all the gasket ports
are traced onto the manifold we can clearly see
how much material is required to be removed. Keep
in mind you should only open the intake ports completely
to the gasket size if the ports on the cylinder
head are also opened to the same amount, or larger.
Once all the gasket ports
are traced onto the manifold we can clearly see
how much material is required to be removed. Keep
in mind you should only open the intake ports completely
to the gasket size if the ports on the cylinder
head are also opened to the same amount, or larger.
|

 Using a die grinder makes
quick work of removing the soft aluminum. It is
good technique to slightly radius the edge as shown
here, rather than leave a hard corner.
Using a die grinder makes
quick work of removing the soft aluminum. It is
good technique to slightly radius the edge as shown
here, rather than leave a hard corner. |

 Periodically check your progress
against the gasket. Once all the ports are completed
be sure to properly clean the shavings out of the
manifold.
Periodically check your progress
against the gasket. Once all the ports are completed
be sure to properly clean the shavings out of the
manifold. |
 Don't stop gasket matching
at just the lower manifold-to-head junction. The
transition between upper and lower manifolds is
also a place to check for alignment as it the throttle
body orifice. As shown, the Typhoons throttle body
opening was severely out of round and well less
than the 70mm diameter we needed.
Don't stop gasket matching
at just the lower manifold-to-head junction. The
transition between upper and lower manifolds is
also a place to check for alignment as it the throttle
body orifice. As shown, the Typhoons throttle body
opening was severely out of round and well less
than the 70mm diameter we needed. |

 The same technique can be applied to matching up
the throttle body opening in the upper intake manifold.
Use the correct sized throttle body gasket as the
template and grind evenly, out to the scribed marks.
The same technique can be applied to matching up
the throttle body opening in the upper intake manifold.
Use the correct sized throttle body gasket as the
template and grind evenly, out to the scribed marks. |

 Trust us, spending a little
bit of time gasket matching before installing intakes
and heads will pay off. It is attention to detail
that makes seemingly mundane engine combinations
make that extra 10-15 horsepower, or run a tenth
or two faster than everybody else.
Trust us, spending a little
bit of time gasket matching before installing intakes
and heads will pay off. It is attention to detail
that makes seemingly mundane engine combinations
make that extra 10-15 horsepower, or run a tenth
or two faster than everybody else. |
Results
As embarrassed as we are to announce it, we figure it's
our duty to let you know we are not immune to the occasional
bout of automotive brain lapses. While attempting to fire
up the motor with the new intake we heard an awkward noise
followed by engine the engine cranking over way to easily,
but not igniting. It became evident after a few more turns
of the key that something wasn't right internally. Suspecting
something timing related the dreaded tear down began.
Soon enough it became clear that a nut had somehow found
its way down the open distributor hole during the intake
installation process, lodged itself between the chain
and sprocket, and when the starter was bumped it resulted
in a snapped timing chain. As if that wasn't bad enough,
the salt in the wounds came upon reviewing the compression
test results -we had bent some valves in the process.
So off came the heads for repair.
Several weeks later the motor was reconstructed and we
were able to obtain some track results. As mentioned earlier,
our '92 5.0L Mustang had been running consistent 12.2
ET's at 113 mph with the ported Cobra intake. With the
new Typhoon intake bolted up the car ran several 12.1X
ET's in similar weather. While the gains are not overwhelming,
they are positive, and inching the Green Machine closer
to a 11 second timeslip - a remarkable task if you consider
the short-block is stone stock with nearly 140,000 ticks
on the odometer.  |
| |
|
| |
|
In
This Article:
We gasket match and install a budget minded EFI
intake manifold from Professional Products. |
|
| |
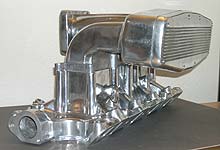
The Typhoon is based on Edelbrock's
Performer RPM EFI manifold design. Advertised to operate
in the 1500 - 6500rpm range, it is suitable for 5.0L
motors with head and cam upgrades. |
| |

The upper intake features a removable
plenum cover, allowing for easy access to the runners
for porting. Note the vacuum ports are in the same positions
as the Edelbrock intake. |
| |
The lower manifold is a nice
piece. There is plenty of meat around the runners for
extensive port work if desired. All mounting bosses
were tapped and threaded properly, the injector bosses
were free of burs or other potential problems. |
| |

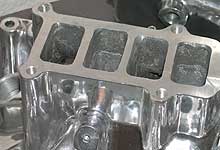
Port sizing on the Typhoon is
significantly smaller than a Fel Pro 1250 intake gasket.
We measured as small as 1.08" x 1.78". The
casting quality is not perfect either, sizes vary port
to port as well as top to bottom. Gasket matching is
highly recommended. |
| |
Comparing the Typhoon's lower
maniflld to the Cobra (top) reveals the major design
difference in runner arrangement. The sequential runners
offers less restrictive bends and an opportunity to
increase runner length. |
| |
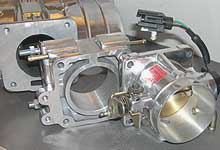
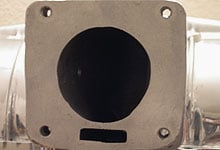
Professional Products also makes
high quality throttle bodies and spacers. Be sure to
gasket match the the opening on the upper intake manifold. |
|
Contacts:
Professional
Products
12705 South Van Ness Avenue
Hawthorne, CA 90250
Ph: 323-779-2020 |
|