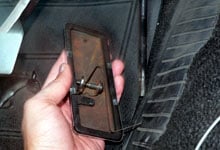
 We start be unscrewing the stock accelerator pedal pad
from the pedal arm.
We start be unscrewing the stock accelerator pedal pad
from the pedal arm. |

 We unbolt the Mustang's factory accelerator pedal arm
from the firewall and pull it out via the engine compartment
side of the firewall.
We unbolt the Mustang's factory accelerator pedal arm
from the firewall and pull it out via the engine compartment
side of the firewall. |
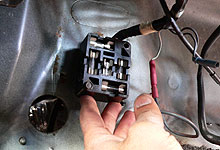
 With the accelerator pedal and firewall grommet removed
we reposition the fuse box slightly higher up under the
dash.
With the accelerator pedal and firewall grommet removed
we reposition the fuse box slightly higher up under the
dash. |
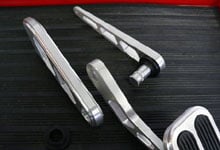
 The repositioned fuse box can be seen here. We used existing
holes in our '67 Mustang's firewall. Shown also is the
teardrop shaped billet aluminum Lokar pedal support.
The repositioned fuse box can be seen here. We used existing
holes in our '67 Mustang's firewall. Shown also is the
teardrop shaped billet aluminum Lokar pedal support. |

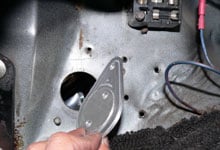
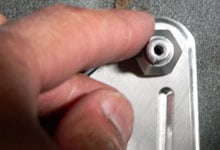
 The pedal support fits into the firewall hole where the
accelerator pedal grommet was previously.
The pedal support fits into the firewall hole where the
accelerator pedal grommet was previously.
|
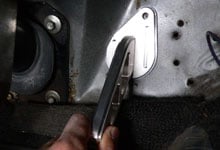
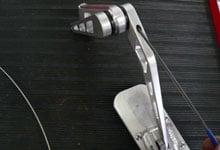
 The pedal bracket needs to be lined up against the mount.
Here is where it helps to have an extra hand. One person
holds this steady under the dash, while the other secures
the screws from the engine side of the firewall.
The pedal bracket needs to be lined up against the mount.
Here is where it helps to have an extra hand. One person
holds this steady under the dash, while the other secures
the screws from the engine side of the firewall. |
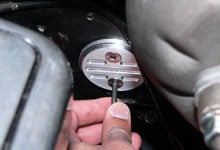
 The round pedal support and screws go on the engine side
of the firewall. You need to thread the screws through
the teardrop shaped support and into the bracket shown
in the previous step. While there is a way to do this
solo, trust us just bribe a buddy to help.
The round pedal support and screws go on the engine side
of the firewall. You need to thread the screws through
the teardrop shaped support and into the bracket shown
in the previous step. While there is a way to do this
solo, trust us just bribe a buddy to help.
|
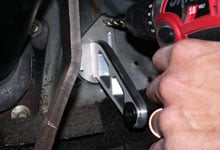
 With firewall sandwiched between the pedal supports we'll
drill the cable guide hole. Ensure that the bracket is
perfectly vertical before drilling, otherwise you'll end
up with a slightly crooked pedal. Drill slowly and use
the hole in the teardrop support as a guide.
With firewall sandwiched between the pedal supports we'll
drill the cable guide hole. Ensure that the bracket is
perfectly vertical before drilling, otherwise you'll end
up with a slightly crooked pedal. Drill slowly and use
the hole in the teardrop support as a guide. |
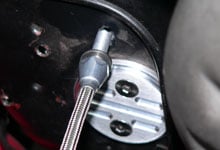
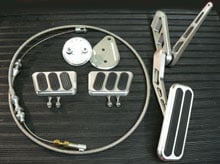
 With the hole drilled we can begin with cable installation.
Pull the cable out of the housing and feed the threaded
boss through the firewall.
With the hole drilled we can begin with cable installation.
Pull the cable out of the housing and feed the threaded
boss through the firewall.
|
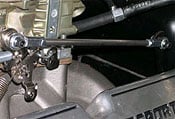
From under the dash secure the cable boss to the pedal
support with the supplied nut. |
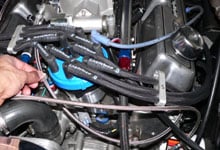
 Route the cable housing to the throttle arm on your carburetor
or throttle body. Avoid any sharp bends which will kink
the cable.
Route the cable housing to the throttle arm on your carburetor
or throttle body. Avoid any sharp bends which will kink
the cable. |
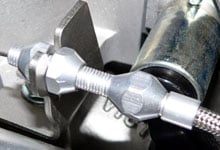
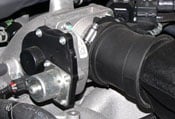
 Secure the cable housing adjuster to the throttle bracket.
The bracket shown here came with our Mass-Flow EFI kit,
however Lokar sells universal carb or EFI brackets. More
Secure the cable housing adjuster to the throttle bracket.
The bracket shown here came with our Mass-Flow EFI kit,
however Lokar sells universal carb or EFI brackets. More |