Page
1
2


Text and images by Richard Mousir

DIY or not?
Converting your early Mustang or Falcon from drum to disc brakes requires little convincing that it is the right thing to do. Anyone who has experienced the unpredictability of front drum brakes during a panic situation has put a disc brake conversion in the top three of their to-do list. However, while there is no shortage of desire there is usually a shortage of funds. Disc brake swaps the likes of Wilwood, Baer or SSBC are not cheap and often require near $1000 to aquire. On the other end of the spectrum are the junkyard swaps. While not ideal, a Granada brake conversion, for instance, get's you at least out of the 1960's braking technology and into the mid-70's disc brake realm. Of course, this is still "settling" and ideally we'd prefer more modern stopping. What to do?

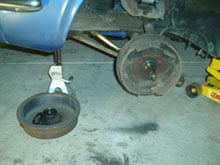
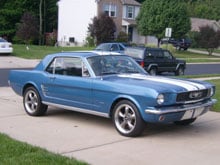
I found myself in this same predicament with my 1966 Mustang. The front drums sucked (so do the rear, but that's for another day.) I wasn't about to drop a grand on one of the aforementioned conversion kits - though their engineered design and convinience was tempting. On the other hand I really did not feel like pulling Granada or Monarch spindles from a rusted donor car 
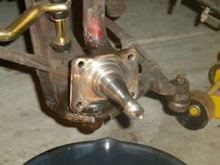
at the local Pick n' Pull. After doing some searching I came 
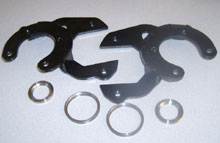
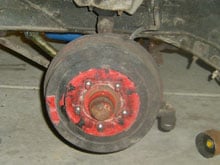
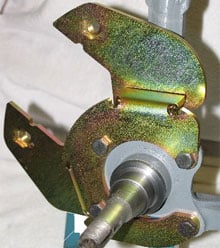
across the ideal compromise. Scarebird Classic Brakes in Washington 
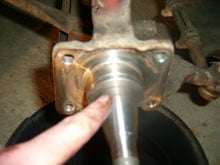
State offers conversion brackets. These laser cut and mig-welded steel brackets simply bolt to the existing drum brake spindles 
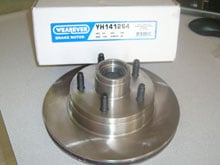
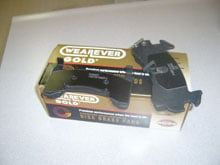
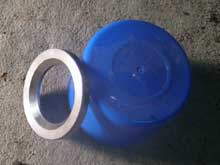
and allow the use of modern, commonly available, rotors, calipers and hoses. The brackets are just $130 a pair, and figure another couple hundred bucks for the calipers, rotors, hoses, mastercylinder and fluids. For under $500 I had a modern brake system. Here is how I did it.


The Scarebird kit for 1963-1973 Falcon, Mustand and Cougar comes with two brackets and a pair of bearing and caliper spacer rings for each side. The brackets were not painted. I painted them black to make them look good. There are two sets of rings. One is a spacer for the spindle (small ring) and the other is a spacer for the caliper (large ring).


Scarebird recommends using rotors from a late model Ranger truck. Which model year rotors you use depends on which year Mustang or Falcon you have:
For 1963-1969 use 1995-1997 Ranger
For 1970-1973 use 1983-1994 Ranger
In both cases specify the 2WD 6cyl Ranger.


I used 1983-1995 Chevy S10 Calipers (2WD) and brake pads. These single piston calipers are quite durable and abundant, as evident by there $12 each price tag at Advanced Auto.


Scarebird specifies several hoses to connect from the factory hardline to the caliper. Which hose you use depends on the length you need:
1979-85 Cadillac Eldorado (17")
1979 Cadillac Seville (15")
1979-84 Buick Electra (12")

I picked up some banjo bolts and cotter pins from the Help! display in most chain parts stores. The banjo bolt will secure the rubber brake line to the caliper.

Along with pads I picked up a few other items to ensure the brake job was done right. I replaced the inner and outer wheel bearings (use the bearings specified for your original spindles - in my case 1966 Mustang.) You'll need the bearing seal, which has to be for the Ranger rotor.

First remember SAFETY when doing any under car work. So once you have the car jacked up and on stands. Remove the wheels to expose the horrendous offenders for the final time.

Remove the drum by popping the dust cap off. Then remove the cotter pin, nut lock, and the spindle nut. Put them to the side. You will need the nut and the nut lock. I replaced the cotter pin. I used a hammer to knock the drum off as the pads may be holding it tight.

I cut the brake hose and then removed the entire backing plate with pads and wheel cylinder as one unit . All it takes is undoing the four 9/16" bolts that hold the backing plate to the spindle. Keep the 4 nuts & bolts to use on the install of the other parts or you can choose to replace them.

Now you get to use the bearing spacer rings. The small ring is a spacer that helps everything line up nice. On the inside of the ring is an angled edge. This goes on the spindle towards the spindle. If you put it on right it will butt up against the spindle nice and tight. If not you will have a space. Space is BAD!

After thoroughly cleaning all the old grease and gunk off the spindle (use brake cleaner), slide the bearing spacer ring on such that it sits flush against the spindle as shown.


(Installation continues)
Page
1
2
 

In This Article:
If you've been holding off on converting from drum to disc brakes due to the cost, here is your solution. A high-quality bracket kit allows you to bolt-on late model braking to your early Mustang, Falcon or Cougar, without breaking the bank.


What do a Ford Ranger, Chevy S10, Cadillac Seville and your early Mustang or Falcon have in common? Nothing, unless you use this bracket from Scarebird Brakes. This allows you to assemble a low cost, high performance, brake package with off-the-shelf parts from the above vehicles. Scarebird makes a similar bracket for 1960-1968 Galaxies.
   
 
Richard Mousir's 1966 Mustang suffered from drum braking woes. Looking for a budget, yet powerful, disc brake conversion he found the perfect solution - a set of brackets allowing him to retain the stock spindles and yet use modern disc brake parts. The money he saved went into a set of late-model 17" Mustang Bullit take-off wheels.