 Now you get to put on the bracket. You will line it up
with the caliper bolts toward the rear of the car. Bolt
it up using the four bolts that you have from removing
the drums. I painted the brackets with black caliper paint
to avoid rusting. Bolts up nice and looks almost stock.
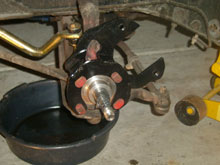
Grease up the spindle.
Now you get to put on the bracket. You will line it up
with the caliper bolts toward the rear of the car. Bolt
it up using the four bolts that you have from removing
the drums. I painted the brackets with black caliper paint
to avoid rusting. Bolts up nice and looks almost stock.
Grease up the spindle. |
 Time for the rotor. I bought new inner and outer bearing
so I had to pack them with fresh grease. Put the large
inner bearing in the back of the rotor and install your
new bearing seal. Make sure you don't bend it and that
it is a tight seal. Lube the edge of the seal with just
a touch of grease from your finger so it will slide
on the spindle nicely. Then put the rotor on with some
attention so that it fits flush. Then put on the smaller
outer bearing, out bearing washer, and then nut. Tighten
and back off ¼ turn. Check to make sure the rotor
can rotate and is not too tight but no so loose that
there is play. Add the nut lock, cotter pin, and dust
cap.
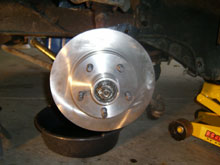
Time for the rotor. I bought new inner and outer bearing
so I had to pack them with fresh grease. Put the large
inner bearing in the back of the rotor and install your
new bearing seal. Make sure you don't bend it and that
it is a tight seal. Lube the edge of the seal with just
a touch of grease from your finger so it will slide
on the spindle nicely. Then put the rotor on with some
attention so that it fits flush. Then put on the smaller
outer bearing, out bearing washer, and then nut. Tighten
and back off ¼ turn. Check to make sure the rotor
can rotate and is not too tight but no so loose that
there is play. Add the nut lock, cotter pin, and dust
cap.
|
 Alright get the caliper out and the second larger ring
that you got from Scarebird. Put some brake quiet lube
on the inside lip of the ring. Then put the ring on the
piston of the caliper. It can only go on one way so you
really can't mess it up. If you do it right it should
stay on.
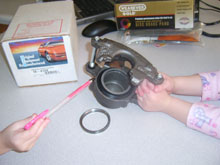
Alright get the caliper out and the second larger ring
that you got from Scarebird. Put some brake quiet lube
on the inside lip of the ring. Then put the ring on the
piston of the caliper. It can only go on one way so you
really can't mess it up. If you do it right it should
stay on. |
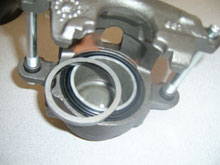
 A close up of the caliper spacer ring.
 |
 Then get your pads out and add brake quiet lube to the
back sides and load them on the caliper.
Then get your pads out and add brake quiet lube to the
back sides and load them on the caliper. |

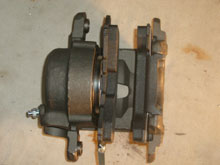
 This is the moment you have been waiting for. Clean the
rotor with brake cleaner and slide the caliper on. It
should line up just perfect. I was very surprised at how
well everything fit together. Also, make sure the caliper
is on the correct side - with the bleed screw at the top.
This photo shows the bleed screw at the bottom, which
is incorrect! The calipers can, unfortuantely, be mounted
this way but you'll have trouble bleeding the brakes free
of air.
This is the moment you have been waiting for. Clean the
rotor with brake cleaner and slide the caliper on. It
should line up just perfect. I was very surprised at how
well everything fit together. Also, make sure the caliper
is on the correct side - with the bleed screw at the top.
This photo shows the bleed screw at the bottom, which
is incorrect! The calipers can, unfortuantely, be mounted
this way but you'll have trouble bleeding the brakes free
of air. |

 As a extra note, I measured the OFFSET from the spindle
arm to the edge of the drum and the spindle and the edge
of the rotor and it is the same at 3.75" so this
should not change the way your wheels will fit. However,
if you are using stock 14" or even original 15"
styled steel wheels, the calipers and larger brakes will
not fit! This is a good reason to get new wheels like
I did.
As a extra note, I measured the OFFSET from the spindle
arm to the edge of the drum and the spindle and the edge
of the rotor and it is the same at 3.75" so this
should not change the way your wheels will fit. However,
if you are using stock 14" or even original 15"
styled steel wheels, the calipers and larger brakes will
not fit! This is a good reason to get new wheels like
I did. |
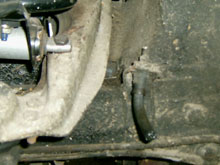
 The next step is to get all the lines and master cylinder
plumbed up. I first removed the brake hose brackets from
the fender well. Shown is the remnant stock drum hose
that I cut to make removing the drum backing plate easier.
The next step is to get all the lines and master cylinder
plumbed up. I first removed the brake hose brackets from
the fender well. Shown is the remnant stock drum hose
that I cut to make removing the drum backing plate easier. |
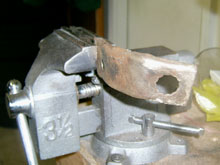
 I used a wire brush to clean up the dirty brackets. Now
when I had it cleaned up I did a trial fit with the new
hoses and found that they didn't fit in the star shaped
hole in the bracket. I used Drumel to grind it out a bit
so I had a fit.
I used a wire brush to clean up the dirty brackets. Now
when I had it cleaned up I did a trial fit with the new
hoses and found that they didn't fit in the star shaped
hole in the bracket. I used Drumel to grind it out a bit
so I had a fit. |

 I painted the brackets with some black Rustoleum and then
locked the new rubber hose into place as shown using the
lock clip.
I painted the brackets with some black Rustoleum and then
locked the new rubber hose into place as shown using the
lock clip. |
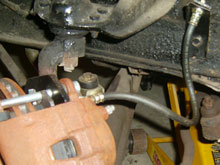
 I ended up using 15" rubber lines from the 1979 Cadillac
Seville as recommend by Scarebird Brakes. With the passenger
wheel turned all the way to the right and then to the
left shows lots of clearance and no binding. You want
a slight 'S' curve in the line as shown to ensure enough
length as the suspension travels up and down also.
I ended up using 15" rubber lines from the 1979 Cadillac
Seville as recommend by Scarebird Brakes. With the passenger
wheel turned all the way to the right and then to the
left shows lots of clearance and no binding. You want
a slight 'S' curve in the line as shown to ensure enough
length as the suspension travels up and down also.
|

 Now since my car is a 1966 Mustang, it came equipped with
the "jelly jar" single resivior master cylinder
- a dangerous design since if either front or rear brakes
were to develop a leak the entire brake system is rendered
useless. I ended up cutting the lines to the original
distribution block and ordering new steel lines from the
block to the front two wheels.
Now since my car is a 1966 Mustang, it came equipped with
the "jelly jar" single resivior master cylinder
- a dangerous design since if either front or rear brakes
were to develop a leak the entire brake system is rendered
useless. I ended up cutting the lines to the original
distribution block and ordering new steel lines from the
block to the front two wheels. |

 There are a number of dual master cylinders that can be
used in this swap - the key is to get one for a drum rear
and disc front setup, as opposed to all four discs. I
used a 1974 Maverick master and a Summit propotioning
valve to regulate pressure since the drums and discs require
differently. The new front brake lines from National Parts
Depot (NPD) bolted up to the stock distribution block
just fine. I then ran a new 3/8" line from the rear
of the master to the open port on the distribution block,
using fittings to connect to the master cylinder threads.
For the rear lines, I ran new line to the prop valve,
then new line under the car about 16", where I cut,
flared and spliced into the existing brake line. The prop
valve is mounted using a hardware store bracket secured
to the firewall with one of the master cylinder bolts.
There are a number of dual master cylinders that can be
used in this swap - the key is to get one for a drum rear
and disc front setup, as opposed to all four discs. I
used a 1974 Maverick master and a Summit propotioning
valve to regulate pressure since the drums and discs require
differently. The new front brake lines from National Parts
Depot (NPD) bolted up to the stock distribution block
just fine. I then ran a new 3/8" line from the rear
of the master to the open port on the distribution block,
using fittings to connect to the master cylinder threads.
For the rear lines, I ran new line to the prop valve,
then new line under the car about 16", where I cut,
flared and spliced into the existing brake line. The prop
valve is mounted using a hardware store bracket secured
to the firewall with one of the master cylinder bolts. |

 After filling the master cylinder and following the normal
brake bleeding process, and verifying the system was leak
free, I bolted up the new 17" Bullit take-off wheels.
This front discs look great behind the spokes.
After filling the master cylinder and following the normal
brake bleeding process, and verifying the system was leak
free, I bolted up the new 17" Bullit take-off wheels.
This front discs look great behind the spokes.
After a few months driving, I can say the brakes feel
GREAT! There is no pulling and the response is quick.
If you don't have big money for the racing brakes this
is a great way to go. I am very impressed with this swap
and I believe that anyone with some mechanical knowledge
can do it.  |