 No matter where your brand loyalties lie, ya gotta love the 1968-70 Dodge Charger. From Bullitt with Steve McQueen to the Dukes of Hazzard and beyond, it has always had performance appeal even though the great majority of them were built with a mild 318. But that’s why Dodge created the R/T, a machine that came standard with a 440/375 and, if that wasn’t powerful enough, you could opt for the 426 HEMI (or the 440 Six Pack in 1970).
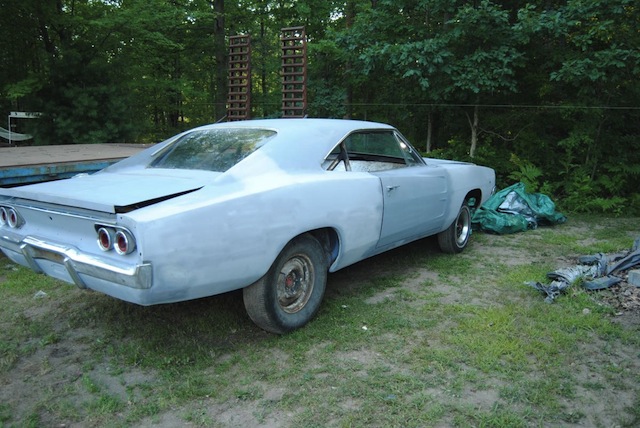
So what does it take to bring a 1968 Charger R/T back from the dead? A suburban Detroit enthusiast named Paul has been documenting his experience on the For B-Bodies Only website.
Paul picked up this Charger in the summer of 2010 with no interior, no engine, and no transmission. Starting during the winter of ’11, he acquired a date-coded engine, rebuilt and installed a Dana 60 rear, and disassembled the car. The latter can be a difficult process because that’s when you discover many issues that you did not see before. The removal of a backyard roll cage installation caused plenty of headaches because Paul had to be careful not to damage the original metal. He eventually discovered that the Charger had been hit on the right side sometime in its past. In the meantime, little by little, parts were acquired as time and budget allowed, with an early find being a rear seat and a 18-spline four-speed tranny.
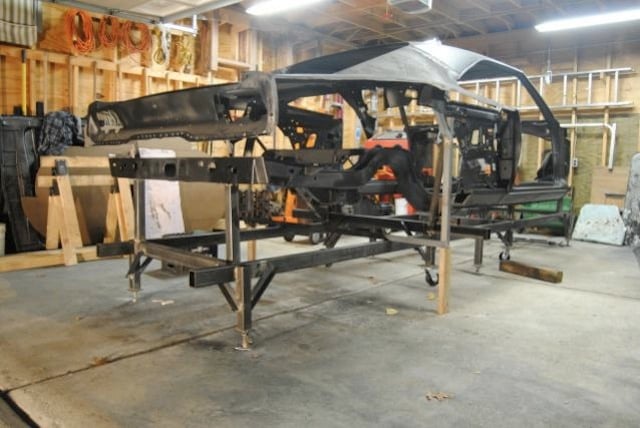
Next was a visit to the media blaster, which showed Paul that body filler had been hiding several dents (even on the roof), but the right front frame rail was not in good shape and needed to be replaced, along with the inner and outer rockers.
Paul found that practicing with metal of similar thickness as to what you will be welding paid off in dividends. He noticed his improvements while welding on the door jambs, rockers, and frame rails. Going slow helped too, and he recommended the use of an auto-dimming welding helmet.
After three months on jack stands, Paul installed the rear cross member, reinstalled the rear suspension, and the R/T was finally standing on its own four tires. Then it was ready for some sand blasting to address the rust that wasn’t taken care of by a previous owner. More words of advice from Paul: “If you do this in your garage as I did make sure you cover the stuff in your garage attic. I only covered some things. Got a little dusty up there.” But then the Charger was all cleaned up and was ready to be primed with DP90.
Thanks to advice on the For B-Bodies Only forum, Paul decided to build a dolly. He also realized his front frame rails were slightly high but the rear ones were about 1/4-inch too low, so he cut them out and put them back where they were supposed to be.
At this point in the restoration, it was winter, 2012, which is not everyone’s favorite time in Michigan. Paul installed and welded in the firewall and upper cowl, and fitted the right inner and outer fender, radiator support, and right door. Test fitting the front end showed that the inner fender didn’t fit well so he adjusted the frame rail, which had tilted. Next up was the floor pan and foot well – so many holes to drill!
But then he found out when he started fitting the trunk floor, the right side was about 1/4-inch forward to the left side. He realized this after he put in the trunk floor, this necessitated taking it to a body shop. They put the body on a frame rack and their laser measurements showed there wasn’t anything wrong, with the left and right lengths being off only 1/16 of an inch, which is within factory specs. That was good news, but it was a hassle because it necessitated the installation (and subsequent removal) of the suspension for the body shop visit.
Next up was the rear valence, tail panel, and bumper reinforcements fitted in place and ready for welding. Then Paul patched the right inner wheelhouse, removing what was left of the old quarter panels and deck lid filler panels. This brought more surprises from previous poor workmanship. Says Paul: ” “Sorry if I’m a broken record on the previous people’s body work but they did more damage than the rust did.”
This is the current place where Paul is at in his restoration. And his advice? “Good tools = good results.” You can continue to read about his restoration diary at For B-Bodies Only.