I’m finally diving into a project I’ve wanted to tackle for a long while — upgrading the suspension on my 1993 Mustang GT. Over the last 15 years of ownership, the suspension slowly morphed into a hodgepodge of parts installed at different times with different goals in mind. It worked, but it was far from ideal. Having already upgraded the brakes and the electronic fuel injection, the time has come to do it right with a fully integrated and engineered suspension upgrade from Maximum Motorsports.
The system is engineered to improve suspension geometry without sacrificing strength or rigidity… —Chuck Schwynoch, Maximum Motorsports
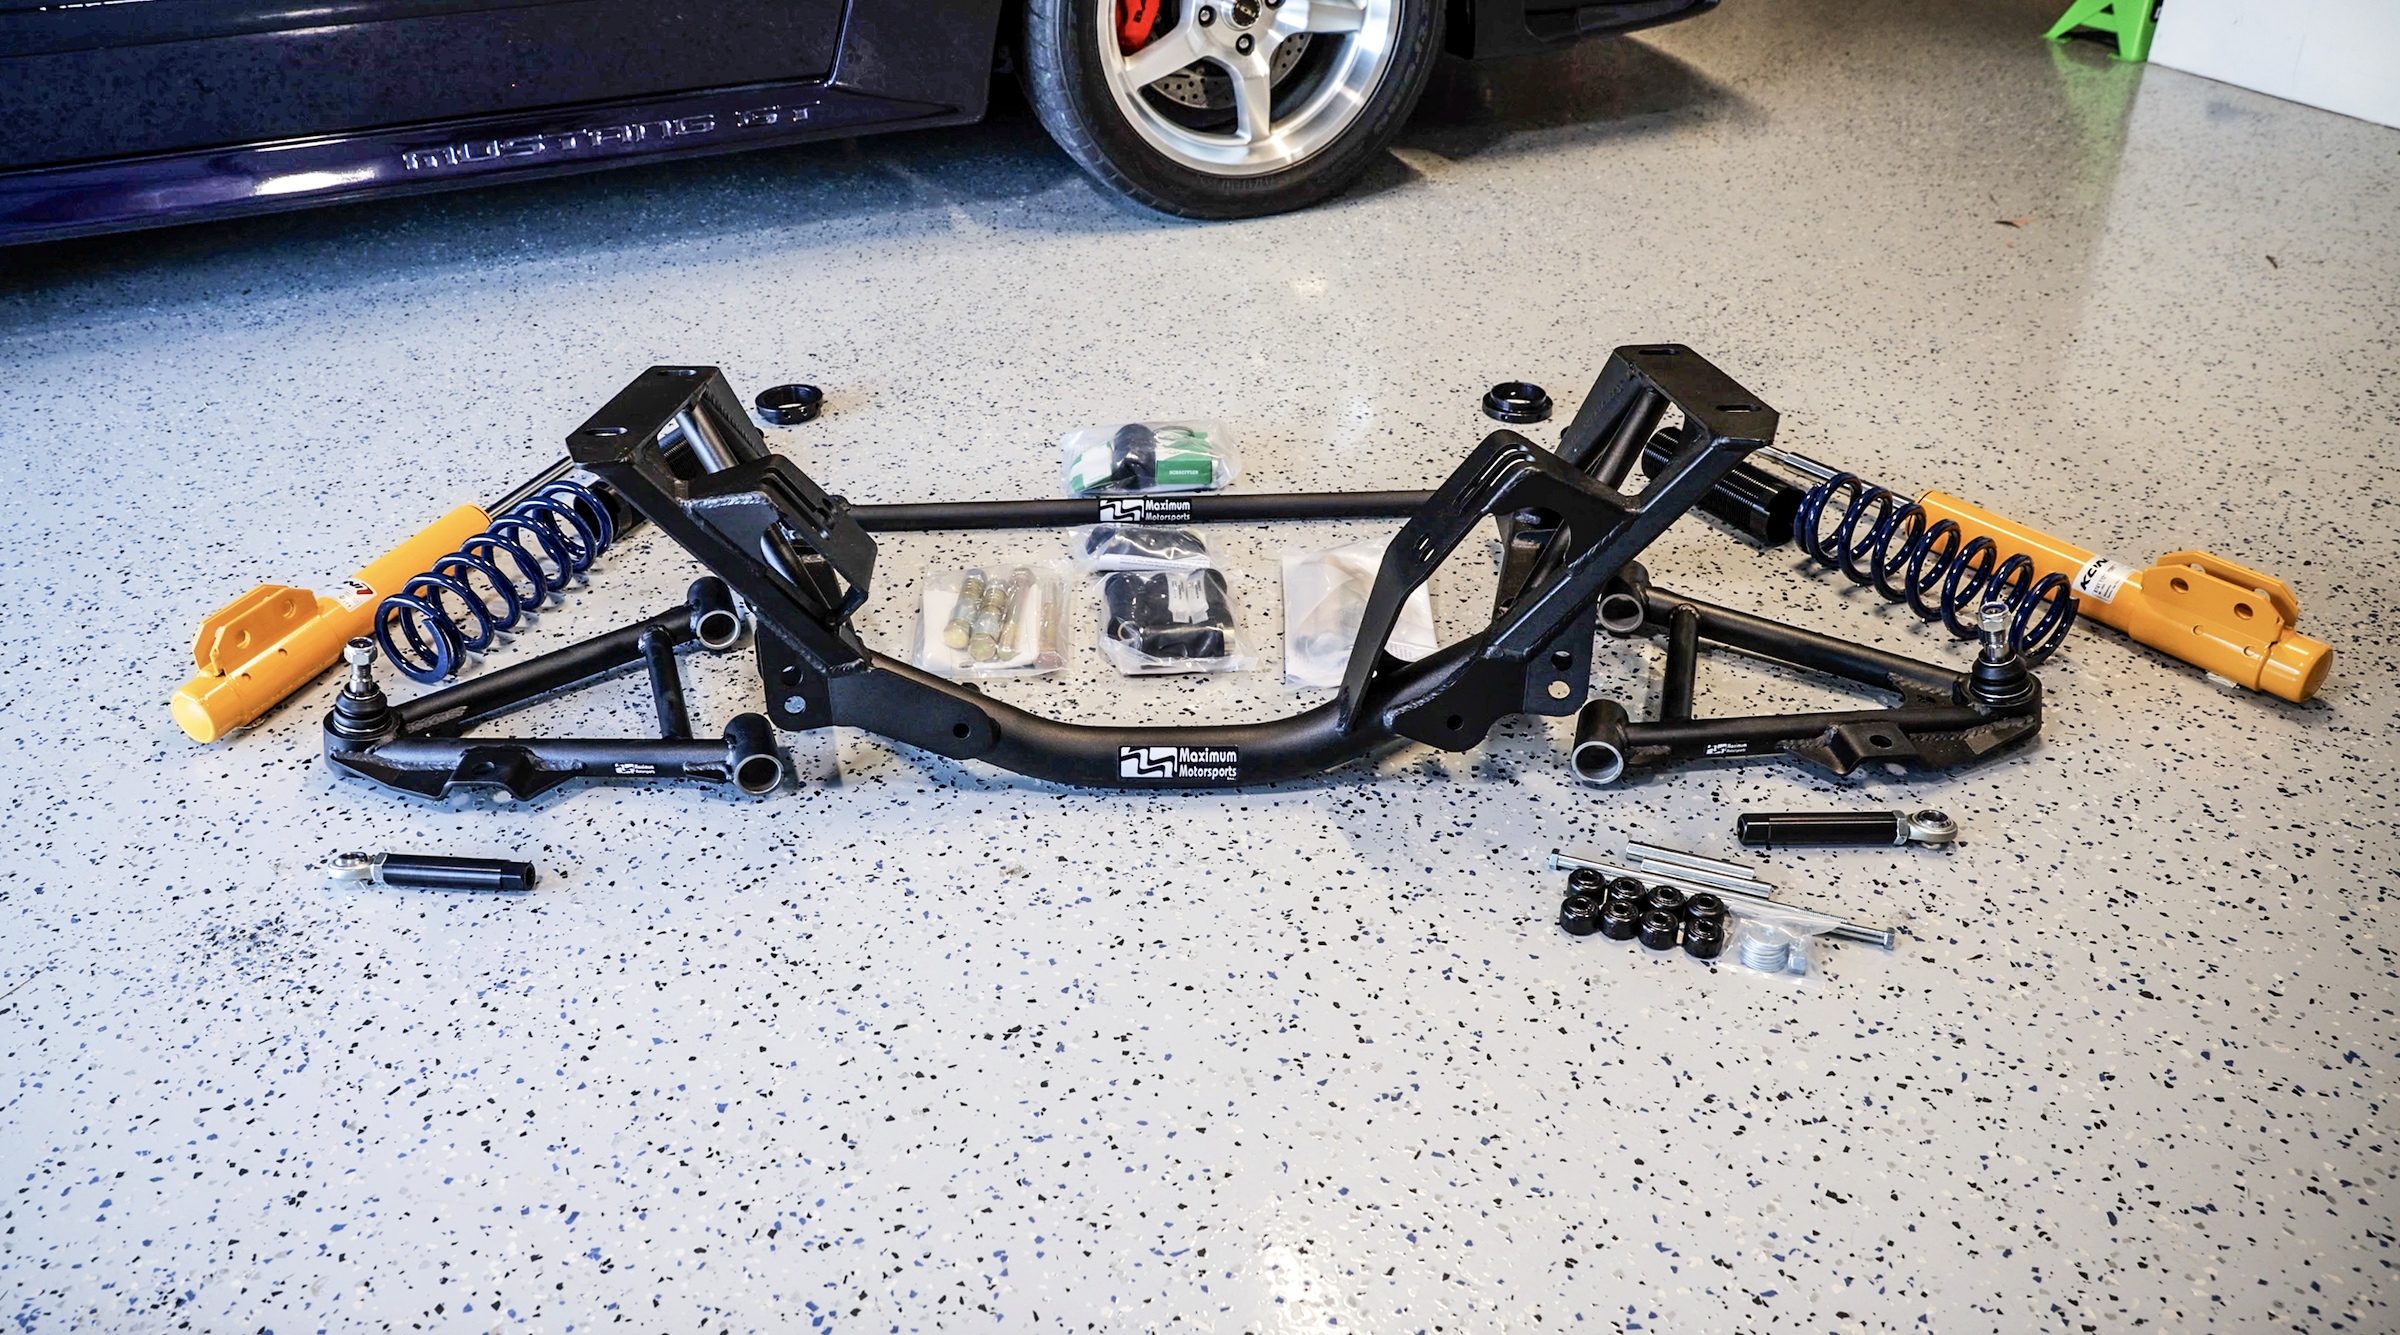
Here, I’m focusing exclusively on the front suspension, starting with what you might consider one of the most iconic upgrades any Fox Mustang owner can make: an aftermarket K-member. But not just any K-member, this build centers around the Maximum Motorsports complete K-member system (P/N MMKMP; $2,416.74), including the control arms and bumpsteer kit. To complement it, I’m also installing Koni single-adjustable struts (P/N 8741-1121SPORT; $321.56), Maximum Motorsports Hyperco 325 lb/in coil-over springs (P/N HYP32510215; $86.00), and an Eibach Anti-Roll sway bar kit (P/N 3510.310; $299.00).

The overall goal? A suspension that’s aggressive enough for spirited street driving and occasional track duty, whether that’s drag racing or road course, without beating me up on daily drives. The spring rate paired with Koni’s single-adjustable struts strikes a great balance between performance and comfort. With that plan in mind, it was time to tear things apart.
All In The Details
Right out of the box, the quality of the Maximum Motorsports components stood out. The welds, fitment, finish, and even the packaging all scream attention to detail. This is the kind of kit that immediately gives you confidence before a single bolt is turned.
“The system is engineered to improve suspension geometry without sacrificing strength or rigidity,” Chuck Schwynoch, CEO of Maximum Motorsports, explained. “The K-member corrects roll center height that’s compromised when a Mustang is lowered, increases caster to improve the outside tire’s contact patch in corners, and uses stiffer bushings to minimize deflection and maintain dynamic alignment. Weight is reduced, but never at the expense of structural integrity.”

The K-member system includes the tubular K-member itself, control arms with bushings, an adjustable rack and pinion bushing kit, and an adjustable bumpsteer kit to fine-tune steering geometry. Maximum Motorsports also offers control arm options for stock wheel location or a forward offset position, and the K-member itself allows for control arm height adjustments and optional engine offset mounting.
Rounding out the setup are single-adjustable Koni Yellow series struts, Maximum Motorsports 325 lb/in, 10-inch coil-over springs, the matching coil-over hardware kit designed specifically for the Koni struts, and an Eibach sway bar with polyurethane bushings and end links. With caster and camber plates already installed from previous upgrades, everything was in place for a clean, modern front suspension package.


Out With The Old
The first step was raising all four corners of the car completely off the ground with it level front-to-back and side-to-side. I recommend using the same style jack stands at each corner, since accurate leveling becomes critical later when aligning the new K-member.
With the car secured, I removed the wheels, brake calipers, and then separated the spindles from the control arms at the ball joints, along with the tie-rod ends. After a few Thor-like swings of the hammer, a ball-joint and tie-rod separator tool made quick work of this.

Next came the struts and coil springs. If you’re working with stock springs, support the lower control arm with a jack, unbolt the strut and sway bar end-links, and slowly lower the arm until the spring can be safely removed. At that point, there’s no stored energy left in the spring, so it won’t try to launch itself across the garage.
With the struts, springs, spindles, and sway bar end-links out of the way, I moved on to the power steering rack. After disconnecting the two steering shaft bolts and removing the two rack bolts, the rack can simply be zip-tied up out of the way — no need to fully remove it.


Dropping Weight
Seeing that massive chunk of stamped steel slide out from under the car was incredibly satisfying. Sitting next to the new tubular Maximum Motorsports K-member, the difference was night and day. The new unit offers more clearance, significantly less weight, and let’s be honest, it just looks fantastic. That absolutely counts.


I removed the factory control arms from the old K-member to reuse the original hardware, then mounted the new control arms onto the Maximum Motorsports K-member, greasing the provided bushings and torquing the bolts to spec. Note: You’ll reuse most factory bolts, except for the two front control-arm bolts, which are replaced with button-head bolts supplied by Maximum Motorsports for clearance.
Installing & Aligning
Before lifting the new K-member into place, this is the perfect time to inspect things like the oil pan gasket, steering rag joint, and engine mounts. With everything out of the way, access couldn’t be better — and skipping this step can come back to haunt you later… (Insert foreshadowing here).
Using my trusty two-jack setup, I raised the new K-member into position and loosely bolted it to the frame. From here, alignment becomes the most important and time-consuming part of the process. The K-member alignment is a two-part procedure: front-to-back and side-to-side. Using four plumb bobs dropped from specific reference points — at the front in the pinholes at the K-member control arms, and at the rear, lower control-arm mounting bolts at the frame. Once the plump bobs are hung, add a piece of tape to the ground to start marking your reference points — from these points, you can measure each side and square the K-member to the chassis.

Once front-to-back measurements were within 1/8-inch, I snugged the mounting bolts and C-clamped the provided L-brackets to the frame. These are clamped, touching the front of the K-member prevent forward movement. Then came diagonal measurements from driver side to passenger side, and vice-versa, while making the adjustments on the K-member left or right with gentle persuasion of a mallet until both diagonals matched within an 1/8-inch.
It’s tedious. It’s slow. But it’s critical. Once everything was square, I torqued the K-member to spec and moved on.
Sharpening The Steering
The Maximum Motorsports system kit included the adjustable rack bushing, which allows you to raise or lower the rack, and the bump steer kit to optimize the tie-rod angle. Before finalizing rack placement, the engine needs to be lowered back into its mounts to check clearance. This is where I ran into a problem; remember my foreshadowing?
Even at the lowest rack position, the rack was contacting my oil pan. The culprit turned out to be worn engine mounts that allowed the engine to sag just enough to cause interference. Lesson learned: Replace your motor mounts before installing the K-member. I then lifted the motor back up, swapped out the old mounts with new Energy Suspension polyurethane mounts, lowered the engine back into place, and suddenly had plenty of clearance. It was extra work, but it solved the problem.

Once the steering rack and rag joint were bolted in and torqued down, the next step was the bumpsteer kit. Its purpose is to align the tie-rod ends parallel to the lower control arms — critical for proper steering geometry with performance suspension components. Though this kit requires drilling the spindles for 5/8-inch bolts to accept the spherical rod ends, do yourself a favor and use a proper drill press or machine shop. I attempted it with a small bench-top press, realized my mistake immediately, and had a local shop knock it out in 15 minutes for $30, which was money well spent!
Moving onward with the spindles bolted back on, I added the necessary bumpsteer spacers, lined up the tie rod ends parallel with the lower control arms, and I was ready to move on to installing the Koni struts and coilovers. Though take note that the final bumpsteer alignment needs to be properly adjusted once everything is back together.
Shock & Sway
The Koni single-adjustable struts paired with Maximum Motorsports coil-overs offer excellent street manners with real track-day tunability and damping adjustments. Plus, swapping out the coil springs for various driving styles, whether changing out for drag racing or road racing, and adjusting the ride height, is simple, making this setup incredibly versatile.
The coilover assembly was surprisingly straightforward: slide the threaded sleeve over the strut, thread on the lower spring perch, add the bump stop, coil spring, and upper spring perch. Ensure that the upper spring perch slides down until it’s flush with the stepped portion of the strut shaft, then simply install the final thrust bearing, washer, seal, and top plate. Before I knew it, the assemblies were ready to go in.


When installing the struts into the fender well, pay attention to clearances around brake lines, the fender, and the body. Also, a spacer is required on the upper strut shaft above the mounting hardware that will fit between the shaft and the caster/camber plate.
One last note is that minor adjustments may be needed for clean fitment, such as bending brake lines or tweaking the fenderwell seams. I then torqued down the upper nut and spindle mounting bolts, and things here are wrapped up.
The final pieces were the Eibach sway bar and end links. After greasing and installing the bushings and brackets, just support the bar with two jacks while bolting it to the chassis. That’s the simple part. The sway bar end links are what’s tricky, so here’s a tip: Install both links except for the bottom hardware.
On one side, install the bottom bushing and nut, leaving out the washer. Then, on the opposite side, lift the control arm with a jack to apply pressure and install all of the bottom hardware. Go back to your original side and repeat. This makes it easy, and you’ll avoid a lot of unnecessary frustration.
Final Prep
With the front suspension fully installed, the last step before alignment was setting the ride height. On a level surface with equal tire pressure, it’s a simple but repetitive process of jacking up the car, adjusting the coil-over perches, lowering the car, measuring from the wheel center to the fender, and repeating until both sides match at the level you desire. It’s not fast, but it’s effective.
Once both sides were equal to the ride height I desired, it was time to hit the streets, but before any high-speed driving, the car was headed to a performance shop for final caster, camber, toe, and bumpsteer adjustment. These are precision steps that require specialized tools, and it’s worth having them done right.


This front suspension upgrade completely transforms the Fox platform. From the K-member to the adjustable Koni shocks, the car is lighter, more precise, and far more tunable than it ever was in stock form. Installation takes time and patience, but the payoff is huge — both in performance and confidence behind the wheel, whether you’re looking for modern ride quality or track-day performance.
Next up, I’ll be tackling the rear suspension to complete the package while following that up with a full driving review; so stay tuned because this Fox suspension project is just getting started!
You might also like
ProCharger Upgrade Elevates Project Airstrike With Big Bolt-On Gains
Project Airstrike is a project collab between Ford Muscle and House of Boost. Here, the 2023 F-150 is boosted by a Stage 2 ProCharger.

