Introduction-
Due to the desire to run in the excess of 8.50 et’s with speeds of over 160mph, the Fordmuscle Ranchero will need a chassis that is up to the task and safe. 2011 will be when I bump up the POWER! I first began by removing engine, trans, wiring, fuel cell and all peripherals . I cut out the old roll cage. I quickly realized the sawzall will be my best friend for awhile. I now will get another chance to do things right, which I should have done in 1999. The class I am building this for requires a stock (type) front suspension which includes and allows the MII modification I already have in place. So, the chromoly tube chassis will be bulk headed into the stock front frame rails.
If you wanna go Fast…You Gotta be Safe!
Here is some information on SFI Safety & Chassis Classifications.
In 2003 The SFI Foundation released four new specifications designed specifically
for the roll-cage design on full-bodied cars. The specifications contain requirements
that will affect at least some of the cars that compete in NHRA events
(national, divisional, sport compact, and local series) and the events of alternative
sanctioning bodies. The significant new and/or modified requirements are noted below:
What Does SFI stand for?
SFI was originally a foundation run by SEMA, the automotive aftermarket trade organization. The letters “SFI” stood for “SEMA Foundation, Inc.” Although SFI is now completely independent from SEMA, the Foundation has retained the name SFI Foundation, Inc. but the “S” no longer means SEMA.
Visit the SFI website for more info: SFI Web Site
SFI 25.1E
Application: Pro Stock-type tube-chassis roll cage; 7.49 seconds and quicker; 2,800-pound maximum Implementation date: on all new chassis or next scheduled recertification, beginning Jan. 1, 2004 SFI Spec 25.1E is an updated revision to the current SFI Spec 25.1D with a few small modifications.
The new spec limits the maximum total ballast to 250 pounds and implements minimum bolt and tab/mount requirements. The spec also provides the interpretation for the 2,800-pound maximum weight requirement. The other change is the addition of a 1 1/4-inch driver-side kidney bar that has been added in three of the four roll-cage configurations.
SFI 25.2
Application: Pro Stock-type tube chassis roll cage; 6.00 to 7.49 seconds; 3,200-pound maximum
Implementation date: on all new chassis or next scheduled recertification, beginning Jan. 1, 2004
SFI Spec 25.2 primarily affects cars that compete with alternative sanctioning bodies. The SFI 25.2 roll cage contains several upgraded components in the floor, roof, sides, and dash. These specifications were developed so that an SFI 25.1D roll cage may be upgraded by replacing several components of one-inch outside diameter (OD) or less with larger components and adding some new components in order to retain some of the other components that are larger than one-inch OD.
SFI 25.4
Application: Pro Stock-type mild-steel or chromoly tube-chassis roll cage; 7.50 to 8.49 seconds; 180.00 mph or faster; 3,600-pound maximum Implementation date: on all new chassis or next scheduled recertification, beginning Jan. 1, 2005
This specification will affect many of the slower full-bodied cars in Comp, E.T. cars, and those that compete with alternative sanctioning bodies. The specification is quite similar to SFI 25.1D with a mild-steel option for the material. The sizes of some components are slightly downsized from SFI 25.1D. It also permits rectangular
tubing for the floor components. The major changes are the Funny Car cage, floor, and cage-support requirements.
SFI 25.5
Application: mild steel or chromoly; full-bodied car, stock or modified/OEM floor pan and firewall with OEM frame or uni-body construction; 7.50 to 8.49 seconds; 180.00 mph or faster; 3,600-pound maximum
Implementation date: on all new chassis or next scheduled recertification, beginning Jan. 1, 2005
This specification will affect some of the slower full-bodied cars in Comp, some cars in Super Stock, many E.T. cars, and those that compete with alternative sanctioning bodies. This specification is quite complex but is similar to how SFI 25.1D has been executed for many of the cars in alternative sanctioning bodies that require an OEM floor, firewall, etc. The spec has a mild-steel option for the material, and it permits rectangular tubing for the floor components.
The sizes of some components are slightly downsized from SFI 25.1D. Based on retention of OEM floors, rockers, firewall, etc., some of the SFI 25.1D components are not required. Other major changes are the Funny Car cage, floor, and cage-support requirements.
Fire system requirements for 2004: Beginning with the 2004 season, all nitro Funny Car and Top Fuel applications where the driver sits behind the engine (nostalgia) and on rear-engine cars with an enclosed cockpit will be required to have a fire-extinguisher system that meets SFI Spec 17.1.
NHRA and SFI Foundation implemented this program to develop guidelines for all of the available systems and to set uniform test procedures and minimum standards for evaluating and determining performance capabilities for systems designed specifically for a drag racing application. For 2005, all additional vehicles that are required to have a fire-extinguisher system must meet SFI Spec 17.1.
Revision to SFI Spec 2.3K: As a result of recent field experience, SFI Foundation has determined that the use of a single back brace in SFI Spec 2.3K will not be permitted on cars built after Jan. 1, 2004. Beginning with that date, all SFI 2.3K vehicles are required to be of a two-back-brace-support design. The specification amendment, which impacts dragsters in Top Fuel and Top Alcohol Dragster, affects all cars built after Jan. 1, 2004, and all existing cars at the next scheduled chassis recertification. For information regarding SFI Spec
Tear Down-
We now begin the total reconstruction of the Fordmuscle Ranchero…
The construction of the 25.2 Certified Chromoly chassis has begun. The Ranchero was put on the frame jig. We set ride height at 7 inches off the ground. It was odd…due to the body lines of the 64/65 Falcons we had to set the back end up 3 degrees! We initially had the rocker set at zero degrees, with the truck dead level the body lines made the ranchero appear to be too low in the rear.
So, that’s when we decided to set the rear up 3 degrees. It was then welded to the jig. The rear of the truck was supported to prevent damage to quarter panels while the old chassis was removed. The biggest part of removal is finished. We will still need to remove a torque box and any remaining metal from old chassis. Then clean up rockers in preparation for the chromoly tubing.
This image show the stance of the Ranchero once the Chromoly chassis is in place. It was welded to the jig at its ride height. The last image shows a section of rocker that will need to be replaced. I drilled out the spot welds, and cut out the bad section, and it will be given a new piece of steel. Wheel is just sitting in there for picture purposes, not that far yet! hehe. Once the rockers are cleaned up and ready, we will then build the new fab 9 rear end and attach the 4-link. This will help find the location for the crossmember. Then the building will begin.
Today I finished drilling out spot welds & cutting out bad rocker sections. I mocked up replacement steel to patch rockers. Both ends of each rocker are to be reinforced to accept the chromoly tubing which will be the foundation of the cage. I also cut the new FAB 9″ rear housing to length and tack welded brackets in place. A little math and geometry and the rear end is starting to look like something that’ suppose to go in a race car!
Mocked up rear suspension to determine about where the 4-link crossmember will be. Once we get the rocker panels patched it will be time for tubing!!! I’m really moving along, unfortunately Holidays and funds are slowing me down at this point. I’m now ready to purchase some chromoly tubing.
Rockers & Floor-
The rocker patch panels are tacked in place and the main cross bar is located. The main bar is the basis of the cage. The main hoop and rest of the cage will be built off of this bar. Note: all bars were tacked in place using a tig welder. Once we have double checked everything we will then complete tig welding.
If you’ll notice, you’ll see the front rocker patches don’t go all the way to the front of the rocker. The headers will be exiting the fender wells there. So, that will be later fabrication.
We scalloped each end of both ladder bar brackets. This will allow the brackets to use horizontal bars for support, rather than just be supported by the weld alone. The main bar was bent down slightly in the center for more clearance, as the drive shaft will be passing over it.
The front frame rails were trimmed to exactly 21 1/2″ off of the front crossmember to ensure equal length. They were then boxed in using 1/8″ steel, leaving a small lip around the perimeter to weld to. This will create the bulkhead that will connect the stock type front suspension to the Chromoly cage.
Locating 4-Link-
We are now locating rear end, and placement of 4-Link.
The upper bar for the 4-Link will tie into the main hoop.
Here is where we discovered our first issue.
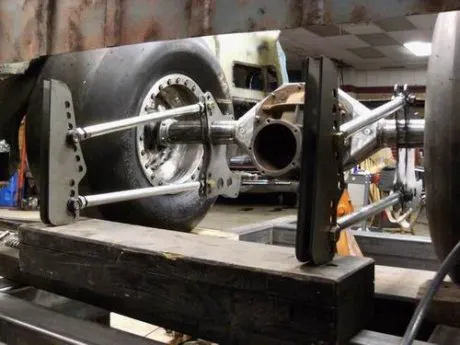
All 4-Link bars are 18″ long. I screwed in all rod ends with lock nuts. I made all rods 21 1/2 center to center. The bottom of the rear bracket is to be Parallel with the ground and the front edge of the front bracket is suppose to be perpendicular to the ground, meaning 90 degrees upright. Directions show achieving a 2-3 degree downward pitch on the lower bars, with both brackets landing in their respectable positions. NOT A CHANCE! I roll rear bracket to parallel to the ground and top of front bracket pitches forward and vice versa.
Seems the only solution would be to take out a 1/2″ out of the upper bars. I will be contacting the manufacturer of the 4-Link for some insight. Even though they say ride height varies measurements, there is still no way to achieve 2-3 degrees down on lower bar, while keeping brackets in position placing all equal length bars in the marked holes. I will post my findings and solution soon. We even stumped the “Dougernaut”….so, I’m going to have to use my mobile shout out.
Main Hoop & 4-Link-
The main hoop is installed and the rear suspension is located. The lower bar is attached to the four link .
The tubes down the rockers are in along with main frame rail tubes and floor cross tubes. There will be another cross tube added to form an “X” pattern on the floor but we are leaving it out for now, just to be able to stand in there to access other areas.
The upper four link bar will be bent next.
The main frame rail tubes tie into the rocker tubes. I will post more as the build continues.
Floor Tube Construction-
Got a bare small block on the motor mounts and bolted up the trans and located the transmission crossmember mount. At this point Pete and I discussed the engine height. Due to the lowered stance of the truck we will be raising the motor in the engine bay to gain oil pan clearance.
I skipped over the upper four link bar for now. It was kicking my butt with the angle the tube needed to be bent and the angle of cut needed to join main hoop. I’m following Pete’s instruction on bar placement to ensure this cage can be certified to 25.2. In the photo below you can see I added the 3 tubes spanning out from where the speed clamp is located. All 3 tubes tie into outter rocker tube. This is done on both sides. The butt bar is only needed on driverside. Pete said he liked things to be symetrical. I’m glad he said that, because I like things that way as well. Plus I can always go back to a two seater if I want.
Rear Chassis Construction-
In this image, Pete illustrates the use of the angle finder to find proper angle for tubing section to be notched for placement.
Here is an arial shot of the rear section starting to take shape.
Pete engineered us some adjustable rear-end stands. This way we can have the rear-end in place at ride height with the tires out of our way.
You can see that the upper bar section has been conquered! It ties the rear section and the hoop together through the four link.
Nate has been a big help contributing to the fabrication and construction of the chassis for the Fordmuscle Ranchero. He moves fast and gets things done. He can barely be seen in this photo in the background. Me and Pete keep trying to help him with his distributor(Chevy) problem! lol. Thanks for all you do Nate , You Rock!
The ziptie is holding the rear section to the main hoop. This will allow the rear section to be completely removed from the truck once it is tacked together, to complete all Tig welds with ease. This particular ziptie is a remarkable peice of equipment donated by Sean Bryk and With a high-grade plastic component, the strap-shaped part is surrounded with the high-grade plastic. During manufacture of the plastic component, it is arranged in high-grade plastic in such a way that it can take up contraction strains of a high-grade plastic. After manufacture of the plastic component it, is durable by bending yet removed quickly by a set of side cuts! Thanks Sean! Not the type of sponsorship I was looking for… Gee, you shouldn’t have! Hah
Just another look. Oh yes, it IS Sexy.
Rear Chassis Construction-
Today we really got alot accomplished. Long day, but very productive! With having the rear section started, we went ahead and moved towards the rear of the truck first. I notched the remaining stock frame rails where the bumper brackets mounted to, for the cross tube that will support the rear of the truck.
We got the second level of the rear section started. We then ran the rear tubes to intersect the rear cross tube.
The top of the second level of the rear section and the wheel tubs will be a little over and inch under the Tonneau cover. I’m 5’9″ tall and the edge of the bed is below my waist at ride height! She’s low!
We also got the Funny Car section started.
Pete and I are very pleased with the way it is coming together. That’s saying alot, because we are our own worst critics. ” Quality is Job One”!
We will be working on it some more tomorrow. I’ll post more pics then.
Special Thanks goes out to Pete Johnson from Nosnhoj Performance for his help and guidance on my project and use of his facility. The crew at Nosnhoj has really been like family and been Very supportive. Also, thanks to: Melissa, Mary, Doug “dougernaut” Johnson, Nathan, Rod & Custom Motorsports Inc. & Fordmuscle for additional help and support.
Dashboard Modification-
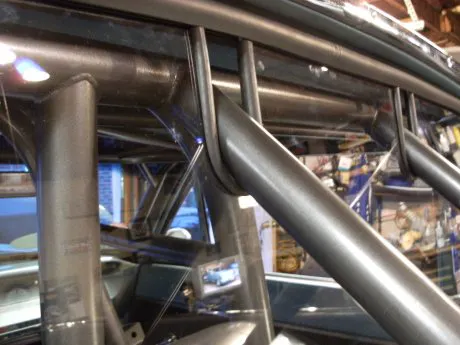
Drilling the dashboard for the “A” pillar tubes was done very carefully. We wanted these tubes to hug the “A” pillar as closely as possible, not to create any more blind spots. We first began by taping off the dashboard where we intended to drill through to prevent excess chipping of paint. Once our center of the tube penetration was found, I used a punch to make a starter. Then I drilled a small pilot hole. Then used a 1/4 bit the same size pilot bit as used on the hole saw. Doing this prevents the drill bit on the holesaw from going through the dash and pulling the holesaw into the dash prematurely, causing damage. I started the hole saw bit, then began to drill and lowered the angle on my drill until it was parallel with the “A” pillar. I then drilled through the dash with the holesaw. The holes came out great with minimal chipping of paint. The tube fits perfect with no gap around the tube. The oval hole I made is completely filled by the angle of the tube!
The Halo tube was bent and put into place but has not been tacked in place yet. We will finish that once the “A” pillar tubes are in. The goal is to have as much of the cage assembled and tacked in place. Then be able to drop the cab section and the rear section individually to complete tig welding and painting. We will also have our NHRA Representative verify we are not missing anything before completing welds.
The upper section to the rear section is started. Notice how the upper and lower rear tube tie into the rear cross tube section. These rear tubes will support the rear of the truck.
Here you can see that the front of the upper rear section ties into the hoop and the four link.
I’m very proud of the work Pete and I are doing. It is coming along nicely and I look forward to more time to spend doing this chassis. Each piece we accomplish has a great sense of gratification. So, all these pictures I am posting are displayed with much pride.
“A” Pillar Tubes-
I thought of something I would like to share with those that are just getting involved in drag racing. Be sure not to get ahead of yourself when making modifications to your car! Look through the rules of all classes you intend to race in. It is possible that you can make irreversible changes that can limit your options. For example in my situation, I went with a full tub rear suspension to put fat tires on back in 1999. Then realized now I need to run a 10.5W tire. That’s fine I can just put a set of those on I have PLENTY of room. BUT, some classes require stock rear frame rails as well. Only allowing the notching of rear frame rails( leaving inner panel of stock frame rail). Again, hind sight is 20/20. So, Think Ahead.
“A” Pillar Tubes-
We have completed the “A” pillar and under dash tubes.
We installed the Horn shape tubes on each side of the transmission. We had the seat in to check head clearance and such. Without the package tray being behind me I’m able to sit back 6″ inches further. My feet are barely to where the horn shape tube meets the main frame rail.
Here is more of the funny car section being constructed. We are going to have to get the doors on to finish the Funny car section, this way we clear the arm rests and window cranks.
Here you can see the “X” in the floor. The floor tubes are finished. You can also see in the center, the 2 tubes coming from the main hoop down behind the trans to the floor. This will have a flat peice of aluminum along with the sides. Then, the driveshaft tunnel will fade right into this. Should look real nice when it’s finished out.
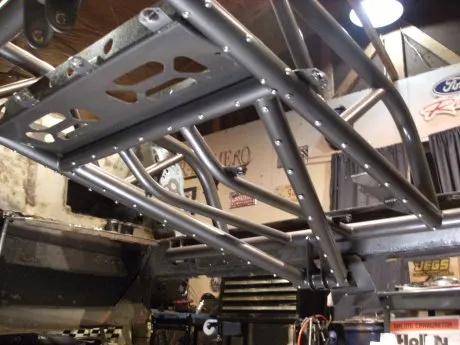
Here we added the gusset tubes between upper and lower levels of the rear section.
Upper Shock Mounts-
We are using an adjustable upper shock mount set-up on the rear. The brackets were for a square tube chassis, so we re-notched the brackets to work for this chassis.
Here are some pieces I made up to box in the brackets.
Here’s how the pieces fit around the bracket. You’ll notice the top hole will not be utilized.
You can see I used a heavier piece of steel on the top. This will have a 1 1/4″ gusset tube connecting to the upper bar for support. This will reinforce the rear shock mount, as the whole rear of the truck is supported at this point.
This is the front driveshaft loop. Which will be removable.
Here’s the rear driveshaft loop, which will be welded in place. I made some bushings on the lathe that went into both sides of each loop before welding them together.
Driveshaft Loops-
We resumed with driveshaft loops.
This image shows the front loop tacked in place.
Here’s the rear loop tacked in place. Also a few extra shots.
We got the other upper rear tube bent and in place.
These pieces will be a nice finish to some of the 1 5/8″ corners. These gussets aren’t necessary, but once I saw ’em …I had to have ’em!
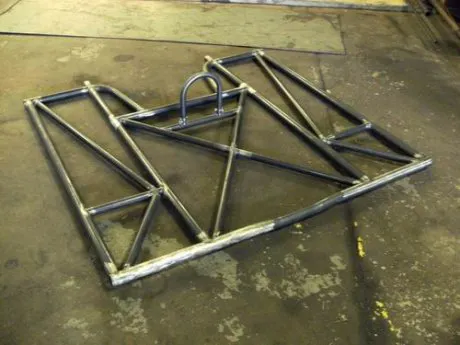
The wishbone is also assembled and ready for install. The wishbone is a track locator. This will center and stabilize the rear end housing.
Halo & Welding-
The roof tubes are now in place.
The rear section has been removed for finishing welds and additional bracketry.
You can see the short support tubes we added to reinforce the upper shock mounts. Also, the anti-roll bar has been located.
We moved the rear section to “Home Plate”, which is the solid steel welding table. This will allow for easy access for completion of all welds.
Jonathan Savoy was recruited to help out with the mass welding. His superior welding skills were needed to acheive strong and appealing welds. Thanks Jonathan, great work man!
More gusset tubes were added between upper and lower sections towards the rear. Each gusset tube increases the strength of the main tubes, creating more rigidity throughout the entire structure.
We have located the fuel cell and created support tubes and mounting tabs to affix the cell to the chassis. The 1 1/2″ cross tube for the fuel cell will be a shared support for the battery tray.
Completing Tig Welds-
Along with the rear section, the main hoop/halo section and floor section were removed to complete welds.
Now the chassis has been removed and all welds to the chassis are complete. We will completely weld in rocker patches once it has been in and out a couple of times. We have added gusset tubes to the halo. We will re-install chassis for seat placement and all other bracketry. Then removed again for paint.
Master & Seat Mounts-
We got the master cylinder in and seat mounted. Also, got the doors put on to cut and fit side bars. We wanted to be sure the side bars cleared the arm rests and window cranks. Seat is located and mounted. The steering kit has been purchased and will most likely be the next install along with accelerator pedal.
Paint Testing-
The parachute handle bracket & cable mount have been welded on, along with a tab for the fire system cable. The painting of the cage now begins!
Extensive research was done prior to my decision to paint my roll cage. A roll on method was considered. I chose to rattle can it! I searched for the perfect color and ended up with: Rustoleum Metallic Charcoal Gray( Item# 244228). The paint was applied easily, with the cage in pieces. Texture is great! Not too shiny but smooth and metallic. Being that the tubing already has a gray protective coating, It covered well with a few light coats.
Once it was completely covered I laid on a couple heavier coats for consistency and shine. I didn’t even hang one curtain! I faded out about 6″ to the areas where the peices will be welded. This will insure there is no paint bubbling during the welding process. Once welded together, I will carefully repaint those areas with the cage in the Ranchero. This color was chosen to highlight the craftsmanship of the cage while not being too overbearing. With the gray color, the interior components should stand out nicely.
Stay tuned…This will be a rolling chassis SOON.
FAB 9 Rear & Shifter Mount-
This Fab 9 rear end gives a new meaning to “BULLETPROOF” !!! Pete and I discussed about how we thought the lower shock mounts were just hanging out too far without support. Pete designed the supports…brilliant! They actually support the lower shock mounts at the same time give something to tie the truck in the trailer. We also gusseted around all bracketry.
Gussets will be added to the front of the 4-link brackets also.
Went ahead and installed wheelie bar brackets for testing.
We also designed the Shifter mount. The “J” shaped tubing connecting the shifter mount to the main hoop will be for mounting all the electronics.
Touchdown!-
We have touch down! Here are the last few items that were done before she left the frame jig.
“The loud Pedal” was installed. It was adjusted before we welded in the under dash tube to the side and “A” pillar tubes.
This is the inside seat mount.
I’ve tried my hand at some tig welding. I learned REAL QUICK you can’t lay beads like this one without alot of experience! This beautiful bead belongs to Mr. Jonathan Savoy.
Well…Here she is….in all her glory! I was SOoo Excited to see it on the ground. Pete didn’t have to say anything, he had the look on his face like a proud father. The Ranchero is about as low as it can be. We saw right away the front end needs to come down 1/2 to an inch lower. It Looks fast just sitting still! Even WITHOUT AN ENGINE! hehe.
We still have a long way to go, but this is a huge milestone! The work and effort that has been put into the Fordmuscle Ranchero to get to this point has been a long and hard road. But, look at the big rewards. Owner and operator of Nosnhoj Performance Pete Johnson, is truly one of the most brilliant fabricators I ever had the pleasure to know, let alone call a good friend. His “Pinks All Out” famed 2005 Mustang GT before the accident, was Awarded Best Engineered car of 2008! Needless to say, but, I’m proud to have a Nosnohoj Performance Chassis!
Our buddy Cody said “Hell, you only gotta pull the front wheels 2 feet to drag the back bumper!”. I would have to agree!
Stance-
As you can see lowering the front end 3/4″ made all the difference in the stance! The front wheels still turn lock to lock with no interference with the fenders.
Before Lowering
After Lowering (Sweet)
Here’s just a close up of the new Weld Magnum wheels with the Wilwood brakes showing through.
Once the four link is dialed in, and instant center is achieved, this thing outta leave like a slot car!
Crossmember Reinforced-
We are in the process of doing some work to the front end now. The dog house was removed. The decision has been made to go to 14.5:1 Compression on the engine this time around, so, the front crossmember will made removable… because at that compression ratio my rod bearings just became a regular maintenance item. I’ll post more pics soon.
This first image shows how we ran tubes on each side of of the front stock frame rails. These tubes will direct load towards the crossmember, and share load of the chassis on front bulkhead where tube chassis dead heads into stock frame rails.
I cut out the center of the front crossmember and made endcaps for each side. We used hinged clevis’ with 1 5/8 tubing. This will allow me to pull bolts and remove the crossmember, then oil pan for Main/Rod bearing access with the engine in the truck. We have ordered a threaded bushing for the passenger side rack mount. Bushing will be notched to mount to our crossmember and a shorter bolt will slide through the rack and thread into bushing, supporting that side of the rack.
This truck has some hideous frame rails, so I used some posterboard and made some templates. The thin sheetmetal was made 2″ taller than the rail. We then put the peices in the break and bent the 2″ section over 90 degrees to cover the top of the frame rail leaving a seamless corner. These thin sheetmetal veneers make the rails a little easier on the eyes. The sheetmetal veneers along with the rest of the front frame rails and suspension components will be painted the same color as the tube chassis.
We re-installed all the suspension and set it back to the ground. We then decided to weigh it just to see where we stand. As of right now… minus doors, hood, fenders and glass weight is: 1,140 lbs.
Driver Sheetmetal-
Pete has started sheet metal work. Or should I say Sheet metal Artwork!
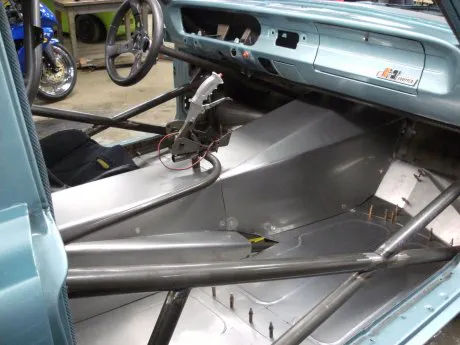
The floor section under the seat is aluminum. The seat is mounted to the cage, no worries there. The lower back sheetmetal piece rolls over the main hoop. The back piece of aluminum rolls out toward the hoop and both pieces will be joined to the main hoop. The very back piece of aluminum also lips up over at the top edge where the window goes in. The rubber seal of the window will cover the top edge of the aluminum.
The front floor section is steel. Beads were put into the floor for rigidity and prevent the floor from tin canning when I step in with body weight. The hole is where the Master reservoir will come up through the floor.(You can see the EASY BUTTON on the dash!)
The small oval hole towards the front is where the brake pedal comes up through the floor.
This is very cool! This Piece was bent one section at a time to form this funnel.
This funnel will allow the extra room needed to exit exhaust pipes out through the fenderwell!
Sheetmetal Floor-
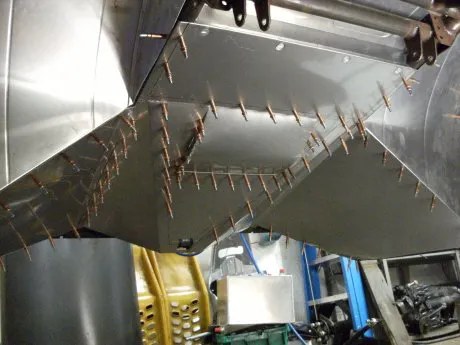
We have got the sheet metal in on the other side. These images show the bead rolling technique used to strengthen each section of flooring. The Klecko pins holds sheet metal in place temporarily for the construction process. Next will be the back half of the tunnel. Most of it will be removable with the use of Zeus fastners.
Sheetmetal Tunnel-
The bead roll looks great, and will eliminate the tin can effect…But I will install carpet on the floor pans only I think. or at least speaker box material to act as carpet. It will be easier and look nicer but yet help keep rattling to a minimum. Got the seat in place just to sit in it and cop a feel. PERFECT!
The rear part of the Tunnel came out great!
We will build a cover for the master cylinder.
I will have a boot to slide over the brake pedal and attach to the floor.
Welcome Fordmuscle Ranchero Fans! You will now be able to follow our build progress right here. Thank you for all of your support FM Members. The project at hand is the front crossmember modification. The decision to raise the compression ratio to 14.5:1 will require regular maintenance of Rod & Main bearings. This modification will allow maintenance of bearings with the engine still in the truck.
Front Crossmember Modification-
A threaded bushing was measured and welded to the new removable crossmember. I added a heavy washer to the front of the bushing to allow more surface for the rubber rack bushing to push against once it was bolted in place.
This image shows the bushing thickness was critical in keeping our rack parallel with the crossmember.
We still have some tig welding to finish on the crossmember, and get the new bolt that will be used on the passengerside of the rack.
Tonneau Cover Modification & 3rd Member-
The tubes exiting the back window on a SFI 25.2 Chassis Classification for a truck are not required to be a certain size tubing, so we chose 1 1/2″ due to the over abundance of it in our arsenal. You can add some key placement tubes elsewhere to actually eliminate the need for tubing out the back window on a 25.2 Classification chassis on a truck. We already had holes in our tonneau cover so we opted to use rear tubes. There is a 1 5/8 ” tube on the rear chassis to accept these rear window bars. We will also have tubes connecting that tube to the lower level of the rear chassis back around the upper shock mount area. This should distribute the load through the upper part of the chassis as well.
We had to make some minor adjustments to the tonneau cover to make it completely removable. The oval hole stainless trim pieces were cut in half where there would be 3 mounting holes on one side and 5 on the other. I then bolted the slot piece that was cut out of the tonneau cover to the end hole on the 3 hole piece of the stainless trim. This will hold our slotted cover pieces in place for cosmetic purposes. Note that tape was added to the surface of the tonneau cover to prevent chipping while slots were cut out. See more on next page…
A test fit of the cover proves our measurements to be correct!
With the Stainless trim rings on and slotted pieces in place it looks far from offensive. I will paint the cut edges of the slotted pieces so they aren’t so defined.
Unfortunately, I was unable to use my Moser axles. Upon dis-assembly I noticed My pinion wasn’t centered when the old housing was originally cut to length. From the frying pan into the fire…I decided to go with a aluminum center section to save some weight, and realized upon dis-assembly that modifications had been made to the housing of the 3rd member to clear ring & Pinion. Not feeling safe about clearancing the aluminum case, I decided to put mine back together only to find the adjusters that allow you to set lash were EGG SHAPED and would no longer move properly! I have exploded many drive-train parts through it, and I guess its time was up! So, I purchased a new Strange Pro N Case and re-used spool, Ring & Pinion, got all new bearings and re-assembled. The Strange N Case is Nodular Iron, so to prevent future rust, it was painted the Chassis Grey. I also replace my yoke with a Strange Billet Yoke. And of course new Strange 33 Spline axles will be ordered.
🙂
Motor/ Mid Plates & Parachute mount-
The forward part of the transmission tunnel is started, and it will be removable in three sections. Meaning the sides will dzus fasten to the top section and the floor pan. All three sections will then dzus fasten to the firewall flange and driveshaft part of the tunnel. The steering column is installed. I chose to replace my 2 5/8 guages and 5″ Monster Tach with 2 1/16″ guages an 3 3/8″ Tach. I modified a 1966 Mustang instrument cluster to accept my new guage package. You’ll notice the cluster fits into the 64/65 falcon dash perfectly without modification.
Every guy needs a Plasma Cam! Draw it on the computer and it cuts it! Pete created the parachute mount using his new Plasma Cam. What a Cool Toy this thing is!
Here are the pieces once they were cut out. They have not even been cleaned up yet! Finding the perfect speed of cutting in relation to metal thickness is key. This will minimize slag left on the part from cutting.
Here is the finished part tack welded together.
The chute mount is tack welded in place. The fiberglass rear bumper was clearanced to accommodate this mount.
Pete located the engine and transmission, then installed motor & mid plate mounts. The front frame support tubes were installed.
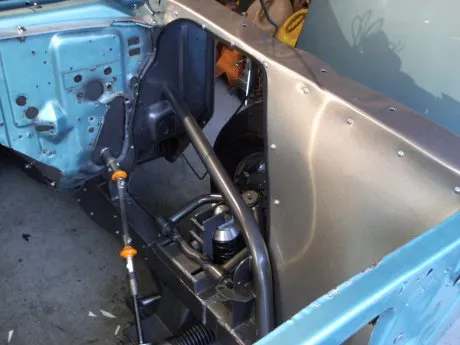
The front support tubes exit the engine compartment and penetrate the splash pan area under the fender and tie into the under dash bar. These tubes reinforce the front frame rails and serve as perfect position for motor plate mounts.
Here Pete and I have installed the mock up block and transmission.
This image shows the installation of the aluminum rear wheel tubs and rear sheetmetal section.
Measurements were taken every inch around the radius of the part of the tub that attaches to the chassis out to the inner part of the quarter panel. Then we were able to connect the dots so to speak and create a line to cut. This gave us the reverse pattern of the body line contour of the quarter panel and allowed us to bring the wheel tub all the way out to the quarter panel. The tub will be removed and attach a rubber gasket and or seam seal the edge of the tub that meets the quarter panel.
Sheet Metal Work-
The sheet metal in the rear is coming along nicely. All panels will be removable either by dzus fastener or chassis and or body panel will be drilled and tapped for button head machine screw, making this project easy to dismantle in the off season for inspection and cleaning.
This torque box section if you will, was created as the dead space between the wheelwell, driveshaft, and driver seat. It is constructed from steel as added protection from tire or driveshaft failure.
Pete Johnson has done an amazing job of fabricating these panels from nothing more than a vision and some measurements. I was able to create a couple of panels myself. This is such exciting experience to be able to contribute to a build of a chassis of this caliber! …Let alone own it!
Sheet Metal / Battery tray
The sheet metal part of this build is nearing completion. The sides of the bed are left and there will also be sheet metal in the engine compartment at a later date once the headers are completed. I am within the two week mark of the Ranchero returning home for paint, wiring, plumbing, engine/Trans, and assembly. The truck will return to Nosnhoj Performance for Headers, finalization, and start-up.
Pete has really utilized his plasma cam machine on many components of this build. Here is yet another piece, the battery tray.
This corner section of the sheet metal in the bed came out great. The other side is a mirror image of this one. All of the sheet metal pieces are like a puzzle they fit together perfectly, but have a certain sequence for removal or installation.
Here’s a shot of the bed completed other than inner bed sides. There are splash pans that go from the bottom of the wheel wells to the back of the truck which are not quite visable in this image.
The front part of the tunnel was re-made to be one piece. It dzus fastens to the floor pan and to the firewall flange. Bringing the entire trans tunnel to a total of two pieces, for easy removal for service.
I could not be more pleased with the sheet metal job Pete Johnson did, Bead rolled and all! To prevent as much rattling as possible, I will be buying stock in rubber washers! I also plan to insulate the transmission tunnel on the under side with a dyno matt type substance.
The Circle track seat was removed in lieu of a wider drag car seat.
Driveshaft Tunnel & Battery Disconnect
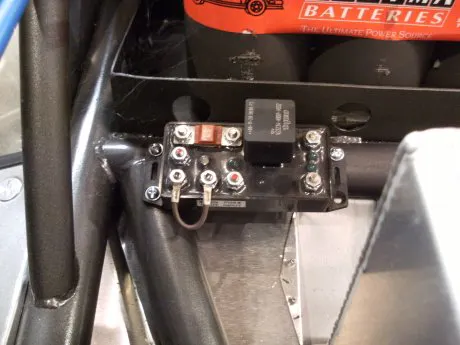
The Drive shaft tunnel is complete. Also, the Battery disconnect has been mounted along with the fire system plunger which will be plumbed to the fire bottle. In event of a fire, the activation of the fire system will shut off power to the vehicle.

Here’s a shot of the sheetmetal under the rear of the truck. Most of the other images I have posted fail to show this part, so here it is.
Due to Barb Nesbitt’s unfortunate accident on August 8th 2010, the NHRA has mandated a Driveshaft tunnel rule for all vehicles that have had the factory floor removed.
Beginning Jan. 1, 2012 all full-bodied vehicles, where the OEM floor has been removed, each end of driveshaft must have round 360-degree driveshaft loops within 6 inches of U-joints. Additionally, driveshaft must be covered by
360-degree tube, covering the front U-joint and extending rearward a minimum 12 inches. Minimum thickness of tube is .050-inch chromoly or titanium. Driveshaft tube must utilize a minimum of four attachment points to the chassis, either bolted with minimum 5/16 SAE bolts or welded or 1/4-inch push/pull pins.
You can follow the links below for more info on her accident and what happened. It’s kind of scary because I really didn’t think much of it with having front and rear driveshaft loops. When I first heard of this accident Pete and I talked…It was a no brainer to get one installed! And what do you know, the NHRA thought everyone should have one too.
Completed Rear Sheetmetal-
The rear sheetmetal for the truck is now complete! You can see how it is assembled under where the fuel cell will be.
The “M” design in the rear is purposely intented for wheelie bar clearance. There will also be bead rolling put into these panels for rigidity.
You can also get an idea of how many holes that will need to be drilled and tapped for an 8/32 button head screw! The idea is to easily be able to remove sections for maintenance or be replaced if need be.
Here is the piece of sheetmetal that finishes out the parachute teather anchor.
Paint & Re-Assembly- Chassis painting has been completed. The tedious job of drilling and tapping is also finished. The 1/8″ holes in the chassis used for dzus fastening the sheetmetal to the chassis were drilled out to 9/32″(29 drill bit) to accept the 8/32″ tap. I used well over 200 8/32″ machine screws & washers, 3 drill bits and 2 taps to complete the task.
Before re-assembly, I used a propane torch and wire brush to remove remaining glue and carpet fuzz from the bed sides. Then taped and covered area for carpet installation.
This carpet is somewhat like speaker box material that is very pliable. I measured the area and cut a piece of carpet slightly bigger than needed. I loaded my harbour freight “El Cheapo” spray gun with the upholstery glue. I sprayed the area on the inner bed side and the carpet back with glue, let set for a few minutes. Then, me and my very helpful, supportive, tolerant, loving, understanding Wife applied the pieces of carpet to each bed side. We then trimmed to fit. Seriously, Melissa was a big help this weekend and I REALLY couldn’t have done it without her. I know, I’m a very lucky man!
The Ranchero has some small corner compartment access doors in the rear of the truck. I carpeted those, and they where installed as well.
Here you can see how the carpet finished out.
The fuel lines were installed. They are not routed in the back yet, but it was necessary to install them before cab sheetmetal was put in place.
The fuel lines are 10AN (5/8″) supply and 10AN (5/8″) return. They are grommeted through the sheetmetal on the front passenger side of the bed.
I cut a 2 1/4″ hole in the top of the rocker panel between the door and wheelwell. The fuel lines were then fished through the rocker to the front of the vehicle. The armorflex insulation is grommeting both lines into the hole in the rocker.
The back window and windshield were installed. After re-consideration, I think I’ll be making a new rear window, to tighten up the holes around the bars and lose all the stickers.
It’s moving along very well, and I will be posting all my work here.
Bilge, Carpet & Rear Window- I installed the new lexan rear window, and I’m so glad I did! The slots in the window for the rear tubes were tightened up and I finished them out with some vacuum hose that I split and slid over the edge of slots on the window. I used a small rope clothes line to insert into the slot of the rubber seal to pull the rear window into place from inside the cab. It was challenging with such a flimsy window, but once it was in place, it got some rigidity back. As much as 1/8″ lexan can have anyway.
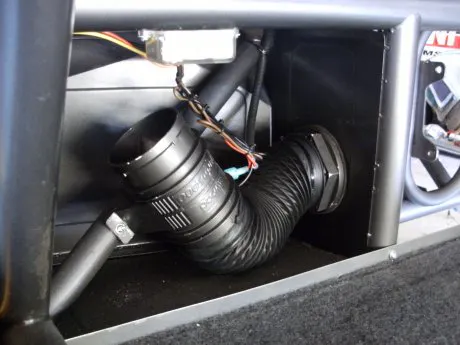
I re-designed my bilge system. I’m using 2 attwood bilge blowers to purge all of the smoke out of the cab after a burnout. The blowers move 290 cubic feet per minute combined. They work very well. I didn’t want the hoses out the back window again, so I decided to make them as stealth as possible. The blowers are mounted in the “torque box area” or dead space between the cab and bed. I used 3″ PVC shower drains with rubber seals on each side of the metal where the air will exit towards the driveshaft. They where painted the chassis grey.
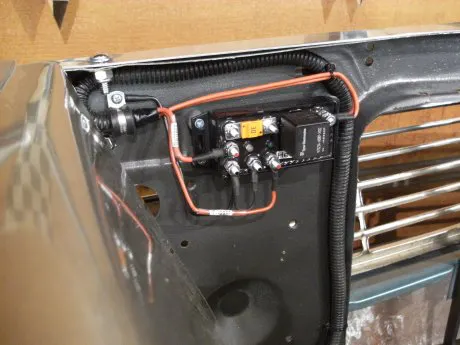
I got this relay that will allow me to operate the bilge blowers with no extra switch. I have a switched 12v supply feeding the relay. Also, this relay has a trigger wire and a timer that is adjustable between 0-130 seconds. The way it will work is, my trigger wire from the bilge relay will be hooked to my line-loc and when I push the button for line-loc, it will trigger my bilge blowers to run for 30 seconds and then automatically shut off.
This image shows how the 3″ flex duct is routed from inside to outside the cab. Notice the small access port in the relay housing for the rheostat timer.
I also drilled a hole and inserted a grommet in the sheetmetal to gain access to the rheostat to adjust time delay.
Both air inlet ports to the bilge system will be hidden. One behind the driver seat and the other by nitrous stuff/ electronics, but not obstructed from moving air.
The carpeting has been finished inside. It is really starting to look pretty good! I put some carbon fiber tape on the bars to guard the door bars from scratches and for appearance .
Battery & Chute Cable, Sheetmetal – The battey cable penetrates the bed sheetmetal and is routed to the back side of the driverside rocker through the area where the bilge blowers are located. It will be ran up the driverside rocker. It will go behind the kick panel cover and will then cut across the firewall to the passengerside under the dash.
The battery cable will end at a bulkhead through the firewall above the starter. A quick disconnect cable from the bulkhead will supply power to the starter in the engine compartment but, also will allow me to tap into power there for my Speedwire system in the cab from the bulkhead .
I have cleaned the undercoating off the splash area under the fender and painted chassis grey. The inner fenders have been opened up for headers and more weight loss.
The front suspension has been painted, and my frame rail covers I made have been installed.
I cut some sheetmetal to cover inner fenders for cosmetics. My inner fenders & Firewall look like someone shot them with a shotgun! I will also be cutting a peice of sheetmetal for the firewall.
The parachute cable has been ran through the cage to exit under the bedcover with grommets on both ends.
Why zip tie it the bar coming out the back window, when you can make it invisible!
This is the fuel pump relay that came with my Speedwire set-up. I drilled and tapped mounting holes in the chassis and bolted it down with the 8/32’s and some blue locktite.
Engine Compartment/ Rear Bumper- The inner fenders have been re-designed. Pete said he didn’t need anymore room than below the front frame support bar to build headers. The fuel lines are laying over the frame rails so I don’t run over them! I put a piece of aluminum over the top lip of the firewall where the old shock tower supports used to be mounted. I will be ready for the engine very soon!
I used sheet metal to make the block off plate for where the blower motor was. I also used metal plugs on the heater core ports.
I painted the whole front suspension and filled all the holes in the firewall and painted it also. This took quite a bit of time to accomplish, considering the firewall looked like swiss cheese! Overall, I’m real pleased with the outcome of the engine bay. Once the engine is in place, the bay shouldn’t distract from the appearance of the engine.
The rear bumper was shaped to match the underside for not only wheelie bar clearance, but without this modification the bumper would have actually caught too much air.
Here’s just a random shot of the fAB 9.
The fenders are on but I still need to align everything.
Wing & Electronics-
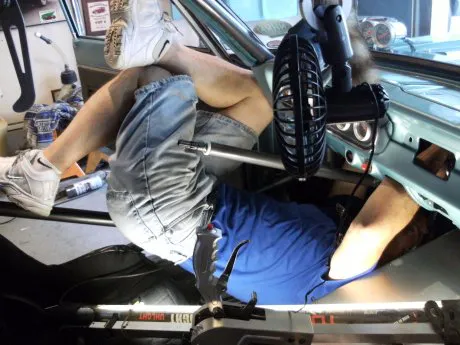
I have begun wiring the Ranchero. Some hate this part, but I really enjoy it. I have the battery cables ran, fuel pump installed and wired, and tail lights are hooked up and ran forward. Nothing is landed to the Speedwire system yet, I will get everything ran first then land and finalize once all the wiring is ran. I also have installed & wired the instrument cluster. Being upside down under the dash is not that much fun though!
I used a 1966 Mustang instument cluster. This cluster allowed me to consolidate my guages for a more uniform look and better visibility.
If your building a race car… You need the Speedwire System! It utilizes a single multi-pin cable to connect the switch box to the board. The switch box is mounted to the 1 5/8″ halo tube with billet aluminum clamps.
This is the Speedwire board. It is considerably better than the hard wire version I made myself about 2 years ago. The board is fire and shock proof. It has on board relays and led lights to inform you of bad and active circuits. I will land all my wires to the corresponding terminals at the bottom of the board. Piece of Cake! The MSD 7531 Ignition is mounted on the other side, you can see the gold edge. I was looking for 1″ billet aluminum clamps to mount the 7531 and the Speedwire board. Jerry Bickel Race Cars wanted $34.00 for one clamp. With an Ebay search, I found the 1″ billet clamps two for 34.00 bucks. They were intended to mount head lights on an ATV, but worked perfect!
The shifter cover was modified. I installed an arming switch with the fancy carbon fiber lid. This will be for arming the line- loc. I installed a micro switch momentary button to activate the bilge system. Above the switch button is an LED light wired to one of the bilge blowers directly to insure activity of the bilge system. The button on top of the shifter handle will be for the trans-brake.
I have installed a fan mounted on the 1″ gusset to halo using a 1″ billet clamp. It will be wired in with the bilge system as well.
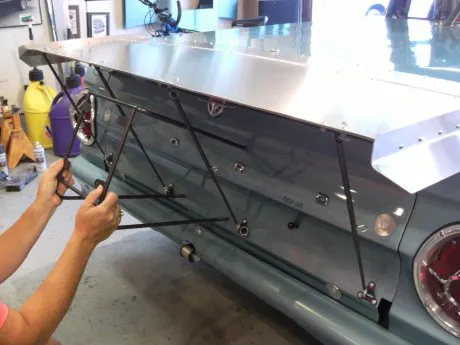
There is not a company that makes a race wing for a 1965 Ranchero. So, I purchased a universal wing kit from RJ Race Cars(Quarter Max). I upgraded to the Pro Strut kit, which is heim joints and spill plate rods. The spill plates are the side pieces of the wing. The wing has a 1/4″ lip that faces upward on the back edge of the wing. This is called a “Wicker” , it difuses the air as it leaves the wing. The spill plates needed to be 1″ higher than the surface of the wing. This helps to channel the air. The spill plates also are 3/4″ longer than the wing. This is to assist the wicker in working properly. The wicker redirects the air from rolling under the rear of the vehicle. The wing is to help keep the Ranchero stable down track. The wing being extended pass the end of the truck keeps the air from wanting to lift the back end of the truck, therefore helping keep it planted at high speeds.
The spill plates that came with the kit weren’t great, so I made my own! I made up the template for them on some poster board then took my template and aluminum down to my buddy Pete’s place. I used his shear press to get them down to size. I rounded the corners and filed them, then put them in the brake and put a 35 degree angle on them. They came out pretty good.
This is where the parachute mount will be located.
Notice, I will have to start lifting the tonneau cover first before I can flip the wing over to access fuel cell. It’s not that big of a deal. It beats having to split the spill plates. I added Pete Johnson’s Company logo.
Trim & Wiring- Pete cut out some new stainless pieces for the Tonneau cover to go around the tubes. I had some extra door panel material that I made the boots with. I polished the stainless and mounted them with chrome bolts.
I mounted my Air/Fuel meter. This is a critical must have tool! This particular model is a single channel with no logging capabilties, But it will work for now until I can upgrade. These meters do a 20 second countdown while the sensor in your exhaust warms up. Then it will display numbers to prompt you whether your running too lean or too rich. This small investment will prevent you from detonating and burning your engine down.
The cut out in the dash for the original steering column location made for a good spot for my shift light. The smaller LED light is a bright red warning light. It will have a designated postive circuit, and the ground will be daisy chained through sending units to Oil pressure, Water temperature and fuel pressure . If there is a failure, this will allow you to lift off the accelerator pedal and save you from any further damage.
I made some delete panels for the radio, ignition, and heater controls. The red LED where the cigarette lighter was is for Visual arming of the line lock.
I made a panel in the glove box for more accessory wiring. I carpeted it with the matching floor carpet leftovers. I purchased a 6 gang raised fuse block and a Positive distribution block. The leads going right into the distribution block are coming from headlight and nitrous solenoid relay boards which are already fused. It sure is nice having extra fuse ports for future use!
I purchased a label maker, and labeled all of my wires. I then found some clear heatshrink to preserve the labels.
The wiring harness was made from 1 1/4 plastic sump hose that I split. All wiring is protected and ran along side of the transmission tunnel, but will easily unplug from Speedwire board and be moved out of the way if necessary. I used a black positive cable so the red didn’t stick out like a sore thumb in the interior. The MSD 7531 Digital 7 is a very nice ignition box. It has laptop accessiblity with a program which enables you to view run Data. You also make program changes such as Boost curve, Timing Retard, launch RPM, Shift points, etc. It is very versitile.
The Nitrous solenoids are powered from this relay board made by Speedwire. They are equipped with LED lights showing power and fuse status.
This is the headlight relay board. For reference, it is located on the radiator support on the driver side. you are looking at the back side of the grille to the right. I hope to be getting the engine in soon. I will keep you all posted.
Lexan & Electrical- The electrical wiring is complete. The longest, most tedious part of the build is finally done! I purchased a new optima battery and installed it. Now it was time to check all of my circuits. I had confidence in my wiring, but it didn’t stop me from wondering if everything was going to work the way I intended. I verified my switches were all off, then I pulled the power on at the disconnect. Started flipping through the circuits getting all excited as the lights lit up and all connections made. I was very happy all worked properly. Below you can see my parking lights, which are merely dash cluster light bulbs mounted in the headlights. I haven’t decided to cut my regular parking lights into the fiberglass bumper yet.
I added some carbon fiber tubing protection to the steering column.
The Speedwire main board is awesome.
I utilized my old switch panel in the glovebox for accessory circuits. The MSD 7531 unit has the shift light operation being triggered by no more than 3 amps continuous to ground, so a shift light relay was added.
Due to the added wing and supports, along with the parachute, it wasn’t going to be as practical to just lift the tonneau cover for re-fueling. So, I added this Mustang fuel door for easy access to the fuel cell.
The side window glass, and wing glass were removed in lieu of more lexan. The door panel was removed. I used the glass for a template to cut the new lexan windows. I removed the window regulators. Leaving enough meat behind the armrests to still pull the door closed, I cut out as much metal out of the inner door skin as possible. I drilled a hole in the lexan at the bottom to install a bolt through a cloth strap. This will allow me to pull the window up. I also added a small piece of aluminum at the top to help push the window into the top track. I put a black plastic plug in the hole where the window crank came through. Velcro was added to the backside of the strap and to the top metal part of the door to help hold the window in the up position.
Some of you know, with night racing, once you get past the traps, on most tracks that’s where the lights stop! And it can get pretty dark in the shut down and on the return road. So, I decided to add some HID headlights! These things are cool. They warm up and get super bright. I just had to get the 8k bulbs with the blue tint being a Ford guy and all. 
Here are some shots of the interior with all the wiring ran. I still have to run the brake light and line-loc wire to the master cylinder. The master is located under the carbon fiber cover in front of the seat.
I’m very pleased how this turned out. Hopefully the next update will involve Engine and Trans installation.
Battery & Hood- I’m in a holding pattern trying to fund the T&D shaft rockers to go on the Blue Thunder headed engine build for 2012. But, other things are being accomplished. I have been working with Doug at Champion hoods and he has created a Cowl Induction hood mold for the 64-65 Falcon. He did a great job! Thanks Doug! This hood is a multi layer of fiberglass just reinforced on the edges and center. This hood is for dzus fastener or pin on race only applications. It is gel coated and ready for prep and paint.
This hood fits the Outlaw style that was meant for this truck!
I also have purchased carbon fiber tubing covers to protect the cage from scratches. This stuff looks cool and has depth looking into it! You can also see I added a carbon fiber water bottle holder from a local performance bike shop.
I wanted to monitor battery charge at the disconnect switch but didn’t want a big ol’ meter hanging out of the back end, so I installed this LED meter light. The light incorporates a built in small chipset board that monitors the charge of the battery and displays colors and a series of flashes to identify how many volts the battery has, for example: If it flashes alternating red and green the battery is above 15.2 volts or on the battery charger.. Solid green is 13.2-12.8 volts. slow green flash is 12.8-12.2. Fast green flash is 12.2-11.8 volts. Solid yellow is 11.8-11.1 volts etc. So, basically myself and all crew members know battery condition by LED color and or flash. Simple but effective.
I also added a pig tail for quick connection of the battery charger.
The battery hold down is not on yet but the batteries are in place with caps and covers over terminals. The batteries are Optima Red Tops(Universal). I got the universal type so I could utilize the side posts to hook them together for more 12 volt storage power. I made a small lexan cover for the fuel pump relay just to divert a wrench if it happens to fall that direction.
Engine & brakes- The 351 Windsor based engine is being built by Scott Gunderman Performance Engines of Indianapolis. This build will include Blue Thunder 3.60 Heads and a Blue Thunder 4500 Dominator split Intake, a 1050 Ultra Dominator along with a Jesel belt drive system to dial in cam timing. I will also be adding an Aerospace crank trigger set-up.
The Blue Thunder Heads will have T&D Shaft rockers. They were purchased through my engine builders contact at Comp Cams. The craftsmanship of these rockers are incredible. The headache of setting valve lash is over! My old set-up had polylocks and a stud girdle. With the polylocks it was ok to set lash. But, once I had set it, I put the stud girdle on and tighted it down and changed my lash. This was very frustrating because I was always trying account for the tightening of the girdle. With the shaft rockers…I can set it and forget it! Well not forget it …you know I’ll always be checking!
Here are the 14.5:1 Wiseco racing pistons. They are gas ported with teflon side skirts, and ceramic coated tops. I will have Eagle H-Beam 6.2 rods with an Eagle 4.0 crank. The last build was 30 over at 12.5:1 compression. This build will go 40 over at 14.5:1 compression. I should pick up close to 120HP with all changes this time around. With the overbore, I will pick up a few cubic inches as well.
The parachute mount has been completed. I added additional support to the chute mount, because the tailgate is an outside skin only. The support was added between the lower part of chute mount and top of wing supports on both sides of the chute . This made the chute mount stable as can be. Also, the chute cable penetrates the tailgate through a grommet. I have installed a third LED brake light under the chute. This is for the knuckle heads in the staging lanes more than anything! The LED has a multi-flash and then stays on when the pedal is depressed. An access hole was drilled on the inner part on the parachute mount, and the wiring was then ran inside the mount tubing and through the tailgate skin for asthetics.
The brakes are complete and operational. I have used a pressure switch to activate the brake lights. You can see a different section around the master cylinder. I fabricated this piece out of metal and then carpeted it. I will eventually remove the driver floor pan and make it all one piece with seamless carpet over the whole pan. This peice was needed due to the rise in the floor pan for brake pedal linkage clearance under the pan. I raised the back 3/4 of an inch fading it forward to the pan surface.
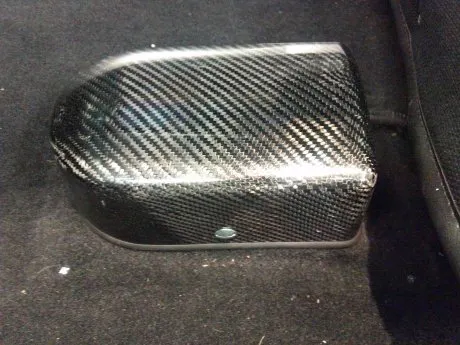
I purchased a carbon fiber master cylinder cover from Jerry Bickel Race Cars. Carbon fiber is not only very light in weight, it’s like diamonds for men.
The Line-Loc was mounted on the inside of the frame rail behind the mid-plate on the driverside. This location is perfect with fender well exit headers. All brake lines were mounted with 3/16 billet clamps. The chassis was Drilled and tapped with 8/32 holes for mounting.
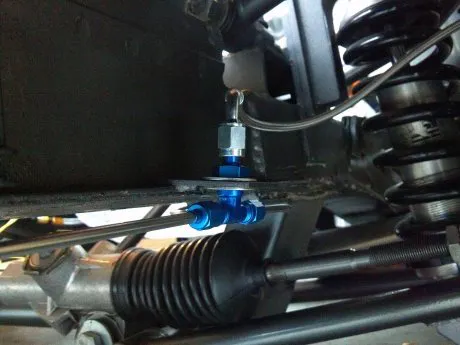
The brake line was tee’d to run to the right front. The line was routed out to the radiator support and across to the passenger side. This will allow the crossmember under the engine to be dropped with out interference for maintenance purposes.
The trans cooling lines were routed up the inside of the passenger side frame rail, using a cooler with 6AN fittings. The lines were also mounted with billet clamps. Behind the mid plate, the trans lines are equipped with “jiffy tite” quick disconnects for easy extraction of the transmission.
Scott Gunderman, of Gunderman Performance Engines, has completed the engine build for the Fordmuscle Ranchero . Scott has a real attention to detail. Not only to the necessary clearances and tolerances of a race engine, but the little things, such has timing pointers, installing ARP bolts where they suit asthetics as well as strength on the small detail items. All of my builds have been top notch, and performed well without failure. Thanks a million Scott!
I have picked up the Engine and brought it home. It made a short pitstop on the driveway for pictures, then, in it went! Pete and I assured that installation and extraction of the engine would be a breeze…and indeed it was.
The color scheme proved to be what I intended. I’m very pleased with it. I took the transmission bolts loose from the mid-plate, supporting the transmission with a trans jack. My wife Melissa was hands on guiding the engine into place as I lowered it into the engine compartment. The front motor plate sat right onto the perches that Pete built. With just a couple of wiggles, the rear of the engine and the transmission found each other. My buddy Shelton and his wife Nat showed up with hardware and a helping hand. I first installed the bolts near each engine dowel pin pulling them together, then installed the remaining bellhousing bolts. Next was bolting the torque converter to the flexplate. Then I installed the starter. At this point it was time to stand back and take it all in!
Very Sexy!!! The Ranchero now has a lower center of gravity. The adjustments Pete made for the engine and Trans really show now. The engine was raised in the engine bay due to the lowered stance. The Transmission pan is level with the chassis and the Oil pan does NOT extend lower than the center crossmember! You’re AWESOME Pete!
The hood that was fabricated by Doug at Champion Hoods clears the carb by a couple inches. I hope not to have a restriction. Pete will make a support for the hood, as this high compression big ol’ little small block will try to suck the hood through the 1050 Dominator!
I loaded up the Ranchero to return to Pete’s shop for the fabrication of the stainless steel fender exit headers. When I dropped it off , I picked up Melissa’s 1965 Hardtop Falcon which Pete finished the twin turbo piping on.
I’m in the process of trying to get Mel’s car ready, while the Ranchero is getting headers. Both of these cars will be in Louisville Kentucky for the 2012 Falcon Club of America National Convention. Sorry to say they will not be race ready. Time and Money, there never seems to be enough of either one!

Stainless Headers & Start Up:
The Stainless steel headers have been constructed! Pete and I found “Stainless Headers MFG. INC.” on the internet. I looked through their very informative site. The quality of work they do was represented well throughout all pages on the site. I was very interested, so, I called and spoke with Chris at Stainless Headers. Chris gave me a brief run down of all parts they offered and how they produced their quality of work. I could tell right away Chris was the Header guy I was going with. I ordered several “J Bends”. The bends were 2 1/8 and 2 1/4 as these headers are step headers. I also ordered 2 collectors and 2 small mufflers with band clamps and two 6″ extensions with 2 air/ fuel sensor bungs. The parts were promptly built, processed, shipped and I received the order very quickly.

Visit: https://www.stainlessheaders.com and see more about Stainless Header MFG. INC.
I was very impressed upon first inspection of my new collectors and mufflers! I just kept looking them over, and all I could say was “WOW”! With the quality of my build so far, these headers had to be top notch. If you need Stainless Headers…Call Chris. AMAZING!

The Collector is four 2 1/4″ tubes into one 4″ merge collector with 3″ long muffler.

The blending on the collector was very well done and should flow awesome!

Pete was like a mad man busting these headers out! I was there to help, but was more like a spectator as he wittled these headers out. He bumped out 3/4 of an inch on each port before he started directing the headers out the fenders. This gave room for header bolts. He also was thinking about my spark plug access.

The fuel lines come out of the front of the rocker panel and go straight up and follow along the splash pan area to bulkhead fittings in the sheet metal inner fenders. A heat shield was in order for the fuel lines.

We trial fit the front wheels to make sure we could still turn from lock to lock on the rack.

This was kind of nerve racking! We used poster board and made a template of this fender area to locate where we were going to cut the hole in the fender. We used blue painters tape and taped off this whole area before we started to cut the hole not to damage any paint surfaces. Pete said “Do you want to cut or am I doing it?” I said…”I’m holding the fender”! He just shook his head like, I sure hope this hole saw doesn’t take a walk! hehe. Once the holes were cut, I told Pete, “OK man you can unclench you butt cheeks now!” LMAO. We managed to get both holes cut without incident. In hind site we should have ordered extra tubing off the muffler. The 3″ extension off the muffler will be replace with the 6″ extension. Then, the 6″ piece will be cut parallel with the body and stainless trim rings will be made to prevent burning of paint.

The headers clear EVERYTHING! Great job Pete!

Scott Gunderman took care of the Timing pointer and crank sensor mount.

Here is a wallpaper link to the “JailBait” image that I used as my featured image if your interested.
https://www.loco4fomoco.com/JailBait.jpg
Here are a couple of videos of the engine start up at Gunderman’s. The videos due the Ranchero no justice, as in person it shakes your whole being! When it fired up, I was thrilled to see and feel how much air this thing was moving! You’ll notice it about blows the car cover off of Scott’s car!!!
<iframe width=”560″ height=”315″ src=”https://www.youtube.com/embed/hbXa9DGUQPI” frameborder=”0″ allowfullscreen></iframe>
We got it loaded, minus a return spring on the carb, and a small spill of trans fluid from a loose fitting.
<iframe width=”560″ height=”315″ src=”https://www.youtube.com/embed/QqnUfEHN23A” frameborder=”0″ allowfullscreen></iframe>
I would like to thank all of you that have followed and supported my build since 2009. It has been a long, hard road but well worth every bit of it! I’m far from done. I still have alot of tweaking to do with this set-up. Now, that I have a 25.2 certified Nosnhoj Performance Chassis, I already have plans for an engine combination to get this Ranchero deep into the 7″s! Special thanks to Pete Johnson for all of his hard work with this build. You too Doug Johnson..Thanks “Happy” for your support as well. also, to Scott Gunderman for going above and beyond over his realm of just building the engine. Thanks to my Racing buddy Marshall Smith of “MJ & Sons” for support of ALL kinds! William & Willie of Rod & Custom Motorsports Inc, Fordmuscle.com, Doug from Champion Hoods, Greg from GZ Motorsports, Gil from Speedwire. My wife and bestest friend, Melissa DeVito for enduring this Financially & emotionally pain staking Build. Thanks Honey, I couldn’t have done it with out you. Thanks to friends Shelton & Nat. There are so many of you that have helped in ways big or small that made this all possible. Thanks for Everything…EVERYBODY!!! I will continue to spot light my events and post video of racing progress. Stay tuned for GZ Motorsports Vacuum pump and alternator install. I will also document the set-up of the 4-link etc.
You might also like
Ford Racing’s New Bronco Raptor 4600s Seek Fifth King Of The Hammers Win
Ford Racing heads to the King of the Hammers with five Bronco Raptor 4600s. The Blue Oval hopes to win again in the Ultra4 Stock Class.


