


With wheels up, our shocks were extending to the bump stops, thus we needed a travel limiter kit from Team Z.
427 cubic inches of small-block Ford power rests between the framerails of this car, our Project 666 machine that we’ve been building up over the last three years. We performed a mad thrash in an attempt to squeeze the car into the 9’s at the end of the season, with a 9.94 at 134 MPH, the result of the hard work we put in with this awesome Team Z Motorsports-equipped rocket. The mad thrash taught us a few things, however, as you can see from this launch photo from our test sessions.
With those lessons in mind, we went right back to our friend Dave Zimmerman and his group of craftsmen at Team Z Motorsports in Taylor, Michigan. Zimmerman and his team have built some of the most awesome cars on the heads-up circuit today, and his suspension parts are installed underneath numerous additional NMRA and Outlaw champion vehicles. Read on to see what he suggested for our project!
Travel Limiter Kit

“When you reach a certain level of performance, you need to start worrying about locking the front end of the car down,” explained Zimmerman. ” What happens is that when the power is applied to the rear suspension, the rotation of the pinion and driveshaft attempt to pick the nose of the car up rather than having the car move forward in one smooth, fluid motion. By installing a set of our front-end limiters, you gain the ability to tune the front half of the suspension just like you can with the rear.”
Zimmerman continued, “When you adjust the rebound on the front struts, you can slow down the rate of rise on the nose, and then when the car reaches the predetermined height of the limiter system, the rest of the car acts as if the nose is dead weight, rather than the sprung weight it has when the front end is not tied down. This makes it more difficult for the car to lift the front end on launch past that predetermined point [which you need to figure out by testing], and will instead help to move the car forward and lower ET’s, along with making chassis tuning more repeatable.”
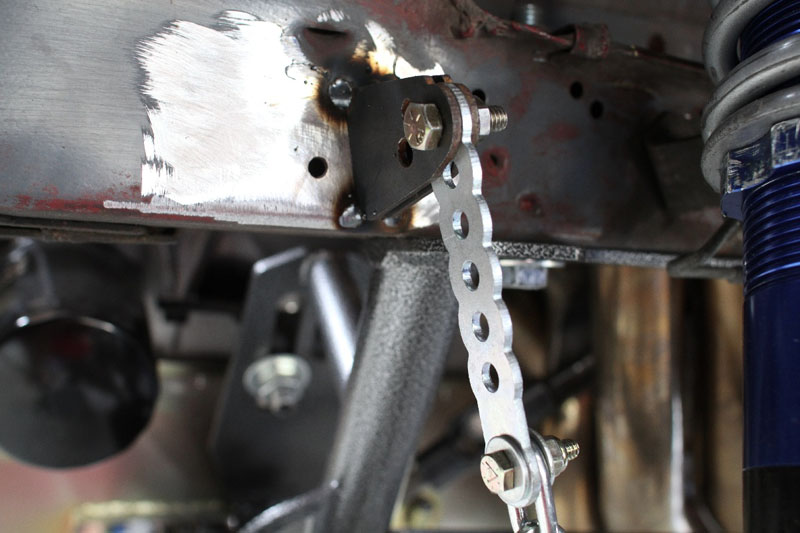
On the chassis side of the equation, the frame needs to be cleaned off in order to accept the new Team Z Motorsports limiter tabs. The tabs get tacked into place until their final position is decided upon, then the final welds are laid.


Since we already have a set of Team Z’s front A-arms installed, we were already provided with a great place to mount the arm-side of the limiter brackets. We used the hole that Team Z welds to the arm for the front sway-bar mount, installed their 90-degree bracket, and were in business. The pins are then used at the top-side of the chassis bracket to provide a quick and easy way to adjust front end travel. Now we’re ready to get back out to the track and convert that upward motion into forward motion and decrease our ET’s!
Weld In Radiator Support
While we were adding the front-end limiters to the car, we also decided to take out some weight in the nose of the car and replace our lower radiator support in the process. It just so happens that Team Z Motorsports offers a nifty weld-in tubular replacement support that comes with optional brackets to capture your stock-style radiator. The replacement requires that you cut out the old unit using a cut-off wheel or plasma cutter in order to position the new one in the correct support.
This process was very straightforward – we just followed Team Z’s instructions and had the new one fully-welded in and the radiator replaced in a short period of time. We removed two pounds and ten ounces of weight while cleaning up the underside of our project in the process.
Weld In Fox Body Radiator Support PN# TZM-FOX-RS
- Lightweight tubular construction
- Replaces rusted or damaged lower radiator support
- Can be ordered without radiator tabs
- Weld in design


While our old radiator support wasn’t really damaged in any way, we took this opportunity underneath the car to install one of Team Z’s tubular lower mounts. Our mount came pre-installed with new radiator mounts to accept our Flex-A-Lite fan/radiator combo. Once we finished up with the welding of the radiator support, we re-mounted our radiator and existing parts back into the car. A flawless installation of a quality part – and we were able to lose 2 pounds, 10 ounces of nose weight!


Following the Team Z instructions, we removed the old radiator and set to the task of removing the factory sheet metal. We used our plasma-cutter to make quick work of the old tin, then cleaned up the area and prepared it to receive the new lower radiator support. The old support weighed in at 5 pounds, 14 ounces. Once the old sheetmetal was tossed in the garbage, we set about the task of installing the new piece. It was a straightforward process – we just held it up against the spot where we removed the old one, squared everything up, and tacked it in before final fitment. The new support even came with brackets to re-attach the nose cone of the car.
Mustang Aluminum Race Wing
The leading edge of the wing where it rests against the decklid should be even with the trunk surface in order to minimize airflow disruption as the air passes towards the back of the car.

Mustang Aluminum Race Wing – PN# TZM_WING
- Laser cut from 6061 aluminum
- Application specific wings for Fox, SN95, and New Edge
- Chrome-moly adjustable struts with billet stands
- All stainless steel hardware
- Powder coating optional
We performed the installation of the wing and in the process snapped plenty of photos to show you the install. As with any other aftermarket component that needs to be fit prior to assembly, we suggest that you measure three times before drilling once, because if all of the wing hinges are not in the correct alignment, the wing will not sit properly on the car.
The leading edge of the wing where it rests against the decklid should be even with the trunk surface in order to minimize airflow disruption as the air passes towards the back of the car. In addition, when you install the struts, make sure to drill enough holes in the support so that you can adjust the wicker (back) side of the wing up or down to add or subtract downforce as necessary.
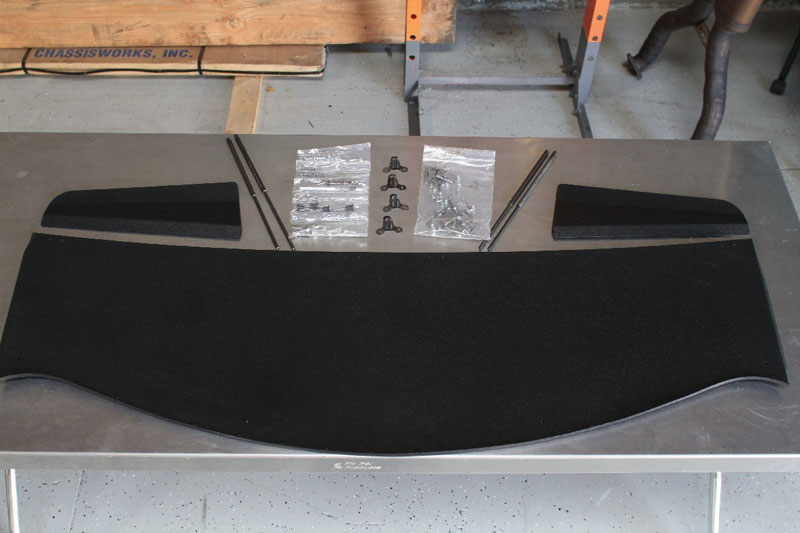
Team Z Motorsports offers this unique wing design for the Mustang from model year 1979 to 2004. It features a curved wicker area that juts out to the top of the parachute to help airflow inflate the canopy. All hardware is included, and they can even powdercoat the wing to your specifications if you’re looking for a particular color or finish!


As we discussed before, measure three times, drill once! The hinges mount to the decklid on our coupe model, and some clearancing is necessary on the underside of the lid for the hinges to mount flush. The same process takes place on the bottom-side wing mounts. Mock up the wing on the top side with the hinges, measure for your strut mounts, mark the positions, and start drilling. All of the hardware is also supplied for this product, and it’s just a matter of making it all bolt together in the end.
The process of installing the wing can be tedious, and it’s very helpful to have a second set of hands for this portion of the install. Once all of the mounting pad holes are drilled, mount the wing landing pad and then move on to the strut installation process. One thing we found helpful when installing the wing was to bolster the underside of the bumper cover with some wide, flat fender washers. This will help to prevent the bolts from tearing through the urethane bumper cover when under pressure.
Better Front End Control, More Downforce, and Less Weight!
All of Team Z’s parts are made from the best materials and designed to work perfectly for our Project: 666 Fox body Mustang. The installation of all the parts took us one full day, and it will pay off in the end with the additional adjustability we have to tune with. The front end limiter will help with our wheels-up launches while the rear spoiler will make the Mustang more stable throughout the run.


