 “Gimme fuel, gimme fire, gimme that which I desire!” This might be the first time we’ve started off a StangTV technical article with lyrics from a Metallica song, but they’re very fitting in this instance. Without fuel, and without fire, you don’t have much of anything when it comes to making an engine produce horsepower.
The focus of today’s article is a set of Performance Distributors‘ Sultans of Spark (SOS) coil packs for the 5-liter Coyote engine. To handle the install and testing we headed to the AmericanMuscle headquarters which just so happens to be about 20 minutes away from our East Coast tech editor’s base outside Philadelphia. AM let us flog their dyno for a “before” test, install the coils, and fire the car right back up for an “after” test of the product to prove out its worth.
As a new entry to your author’s project stables, this GT doesn’t have much done to it in terms of power modifications whatsoever – yet. Underhood, there’s a JLT True Cold Air kit and that’s it. There are other enhancements done to the car; a set of 3.73:1 rear gears, ROUSH axle-back exhaust, and ROUSH lowering springs have been added to enhance the appearance and sound great, along with motivating it off the line.

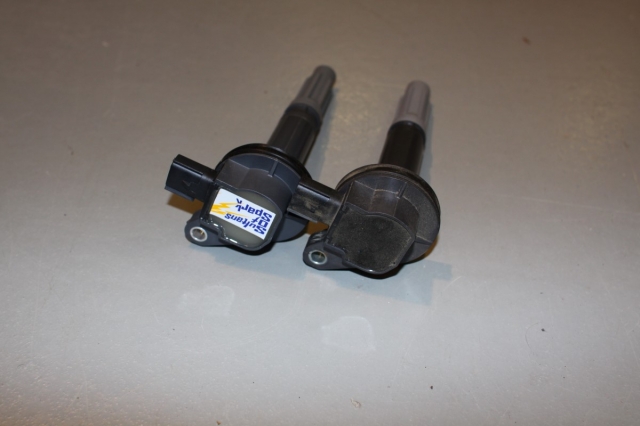
SOS coil on the left, stock coil on the right. Not much difference in appearance – the changes are all on the inside. The Sultans of Spark coil packs use a high-temperature epoxy that is much better at controlling heat within the coil.

Eight little soldiers, all lined up. This is one of the easier installs you can do – it only took us about 25 minutes to do the swap.
Prior to installing our SOS coils on this day, we installed one of Diablosport‘s Trinity dashboard programmers and did some testing with it at BAMA Performance.
As part of the Trinity article, we used the pre-installed tune from Diablosport, changed the options to account for our cold-air kit, and rolled the BAMA Dynojet to 394.4 hp and 375.4 ft-lbs of torque.
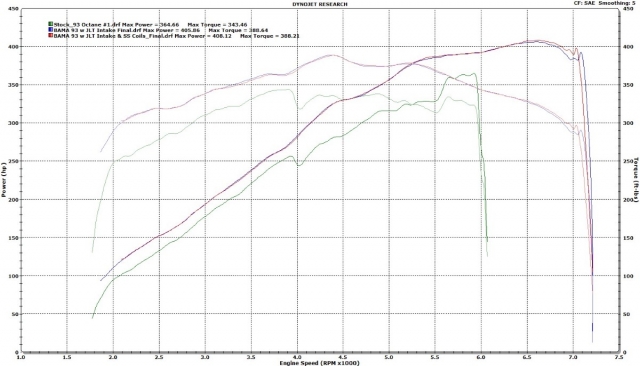
Then, we had BAMA Performance’s lead calibrator, Paul Meister, hook us up with a true BAMA custom tune written with Diablosport’s CMR tuning software. Rolling the dyno with his tune installed into the Grabber Blue GT netted final power numbers of 405.8 hp and 388.6 ft-lbs of torque at the wheels with the custom BAMA tune installed; massive gains of more than 40 hp and more than 45 ft-lbs over the completely-stock numbers of 364.6 hp and 343.4 ft-lbs of torque. Not bad for a cold-air kit and a tuneup.
The last step of our modifications for the day was to install the coil packs and roll the dyno once more to see the results. Read on to find out all of the details on the Sultans of Spark coil packs and how they performed in our application.
Gimme Fire
Internal Upgrades
Inside the coil housing, Performance Distributors uses a larger diameter wire that’s higher-quality wire than what’s in the factory coil packs.
“It’s not easy for us to upgrade these little coils. That was a real challenge for us, and it took us several tries at various combinations of wire packages to fit into that casing. When we begin initial testing we try to pack as much wire into the coil as we can; sometimes it will increase performance during the in-house testing, but we might burn a few out in the testing process. So we’ll take a step down in the wire diameter until we hit the point where we get some performance increase and are able to maintain the durability.” says Davis.
“We’ve beefed up the windings inside the coils with larger diameter wire, and we’ve changed the ratio of the primary and secondary windings. We’re using a better grade thermal epoxy than the factory coils; this helps to keep the coils running cooler. What we’ve really done that makes these run better than the stock coils is that we’ve been able to maintain the voltage with 22,000 volts under load compared to the stock coils at 17,000 volts under load. With the stock coils, when you depress the accelerator, the voltage drops quick and fast. Since these maintain the voltage, you’re able to open up the plug gaps to allow for a better burn,” says Performance Distributors’ President Steve Davis.
These changes are designed to net improved throttle response and fuel mileage. Quicker starting and smoother idle are also benefits of installing these coils, but we’ll get to that in a minute. In addition, spark length is also of a longer duration than the stock coils provide, permitting a cleaner burn.
Into The Hole
This is one of the easier installs you can do on your Mustang. From start to finish, we had about twenty-five minutes wrapped up in the process, and that’s with us stopping Paul to take photos at the same time.
The first order of business is to disconnect the battery. While it’s not likely that you’ll manage to zap yourself, it’s also worth taking the precaution to ensure that you don’t end up on the floor wondering what hit you.
Once the battery’s disconnected, the rest of the process is simple. On the passenger side, you’ll need to unscrew the oil fill cap and disconnect the PCV line. In our case, we have a set of JLT’s oil separators installed in place of the PCV, but since the separators use factory connections at the valve cover side the process is the same regardless. It was quick work to remove them.

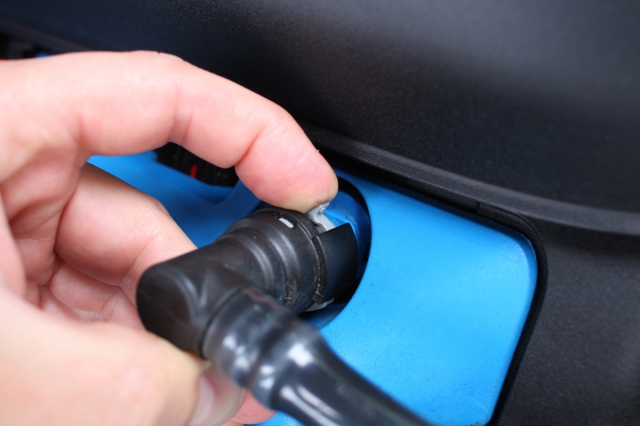
The grey retention tang on the PCV hose lifts up with a finger. Push the hose in towards the valve cover slightly, pull the tang up with a fingertip, and the hose comes right off.
“We’ve been able to maintain the voltage under load with 22,000 volts, compared to the stock coils at 17,000 volts under load.” – Steve Davis, Performance Distributors
The factory coil connections use a red retention tab to lock onto the coil pack housing. This needs to be released, which is done by pulling up on the tab until you hear an audible click. Do this for all eight coil connectors and remove them from the coils by pulling up until the connector is released.
Performance Distributors does recommend opening up the plug gap to .055-inch on a naturally-aspirated application like ours; we had planned to test the coils with both the stock .051-inch gap, which we did, and the increased gap, which we ran out of time to test. They also recommend reducing the plug gap to .045-inch on low boost supercharged applications
Left - The retention tabs simply lift up towards the engine cover with a fingernail, then the connection can be unplugged. Right - The coil packs are simple to remove and replace once the PCV connections and coil covers are out of the way. A single 8mm bolt holds each one in, and they just pull out of the valve cover. Don't forget to use dielectric grease on the tip of the plug boot to ensure moisture stays out of the connection.
On The Roller

We spent the day on the BAMA Performance dyno, and the results were well worth it. Changing out our coil packs for these new units from Performance Distributors was the icing on the cake.
Even without adjusting the plug gap, we immediately noticed that the engine seemed to start instantly at the hit of the key instead of the one or two beats it took prior to the installation of the new packs.
The car settled right into a nice idle, and Meister proceeded to make three more dyno pulls to determine what the Sultans of Spark coils were worth. Given other testing we’ve seen on coil packs with a virtually-stock vehicle, we weren’t expecting to see any increase on the dyno whatsoever. We were pleasantly surprised to see a gain of 2.3 hp to 408.1 hp at the peak of 6,700 rpm over our BAMA 93 octane tuneup, especially since we didn’t open the plug gap at all to improve the flame front.
What We Thought
The engine certainly seems to run more smoothly. Since we had done the custom tune on the same day, it’s difficult to say whether the tune or the coil packs helped with throttle response as the car had a previously installed tune to account for the cold-air kit. On the drive home the car felt much stronger; snappier at all RPM levels and more responsive to throttle pedal input. We’ve had the opportunity to put two tanks of fuel through the car since we had the coil packs installed, and we’ve also noticed an average increase of 2 mpg. We can’t determine whether the tune or coils are most responsible for this improvement, but as our old tune was done by a reputable shop we’d have to lean towards the coil packs improving our performance.
More importantly, we’ve set ourselves up for further performance improvements to the car. Davis notes that these coil packs are ideal for supercharged cars as well, since the increased spark energy helps to promote a full burn when the cylinder is packed full of air.
Since coil-on-plug bolt-on Mustangs typically don’t have the luxury of installing an aftermarket ignition system, improving the ignition system’s performance through the use of upgraded coil packs is an important step in the modification pathway towards enhanced performance.

With our JLT cold air kit, DiabloSport Trinity, and BAMA Performance tune installed, we swapped out the factory coil packs for our new Sultans of Spark pieces and saw a 2.3 hp increase on the dyno. More importantly, throttle response is better and the car feels much more responsive, and we’re ready for whatever engine upgrades come in the future. This graph shows our completely stock pull (green trace), the run with the JLT/Trinity/BAMA tune installed (blue), and finally the coil packs (red).


